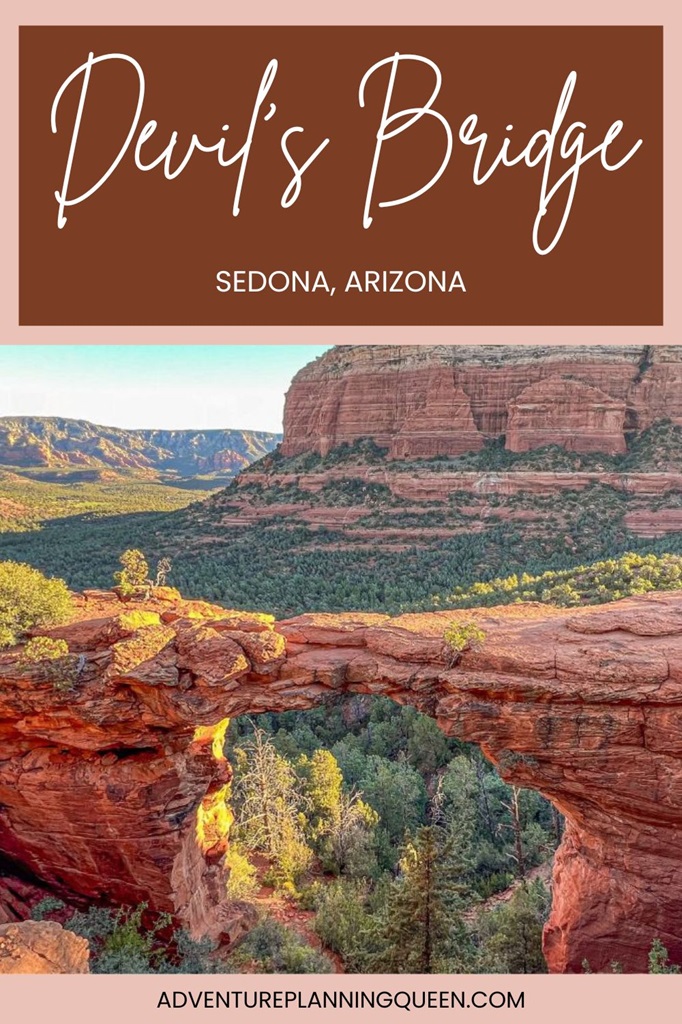
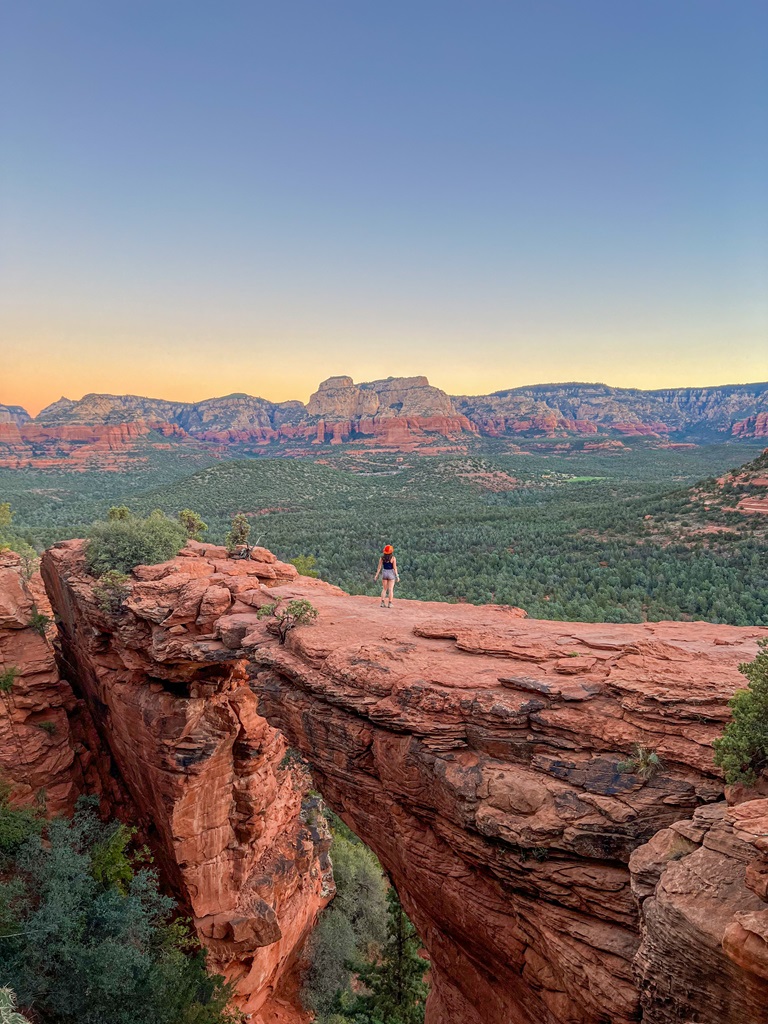
Devil’s Bridge is the largest natural sandstone arch in Sedona, Arizona!
It is a breathtaking destination that truly lives up to its reputation.
Some might say it’s “overrated”, but they only say that because of the huge crowds.
I understand sharing a beautiful spot with a ton of people can be annoying, but it’s so easy to avoid that situation.
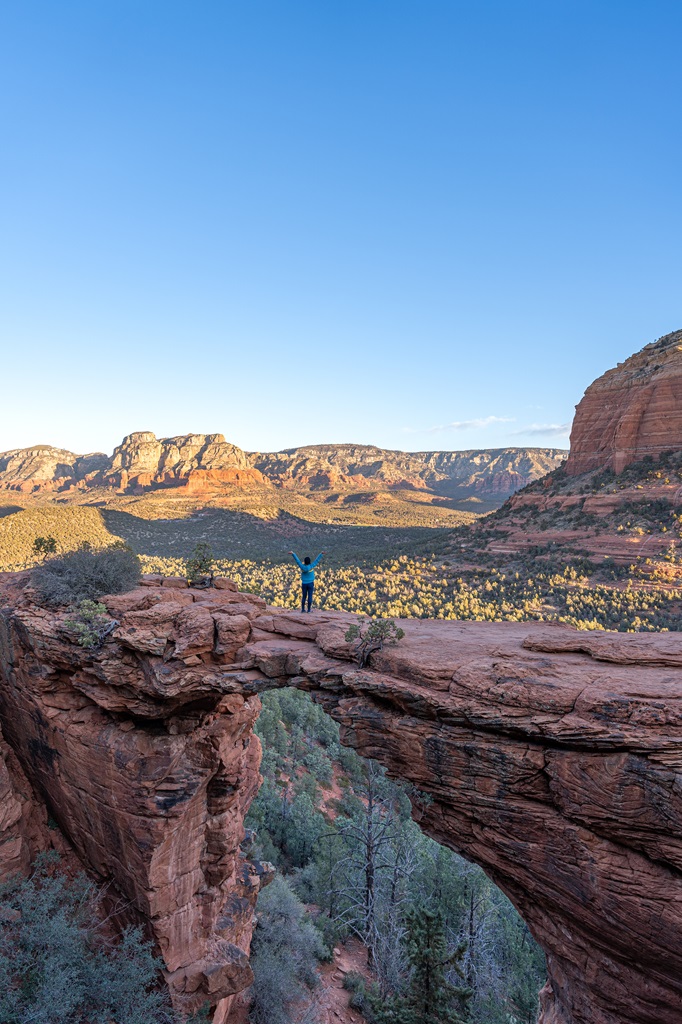
My husband and I have hiked to Devil’s Bridge three times, and each time we started around sunrise.
Guess what?
We were able to enjoy the spot entirely to ourselves (for a little while until people slowly started trickling in), and we didn’t have to wait in a line for a photo!
Devil’s Bridge is one of the most popular hikes in Sedona, so it’s essential to follow Leave No Trace principles and have patience and kindness.
By doing our part, we can help protect and preserve this stunning destination and all of Sedona’s natural wonders for future generations.
This guide has everything you need to make the most of your hike to Devil’s Bridge in Sedona, Arizona!
Affiliate Disclaimer: Some of the links below may be affiliate links. Support the blog by signing up or purchasing through those links at no additional cost to you. We greatly thank you and appreciate you all for supporting us!
Why You Should Visit Devil’s Bridge in Sedona
The term “devil’s bridge” first emerged in the early 1800s, inspired by innovative architectural designs of the time.
The arch, famously known as Devil’s Bridge, in Sedona is the only one of its kind in the U.S., showcasing the beauty of nature rather than human craftsmanship.
Beyond its visual appeal, Devil’s Bridge carries a rich cultural significance, steeped in local legends and Native American history.
The area is believed to be a sacred site, with stories of ancient peoples who traversed the land long before it became a tourist destination.
Devil’s Bridge was formed by wind and weather erosion.
Standing for hundreds, if not thousands, of years, its exact origins remain a mystery.
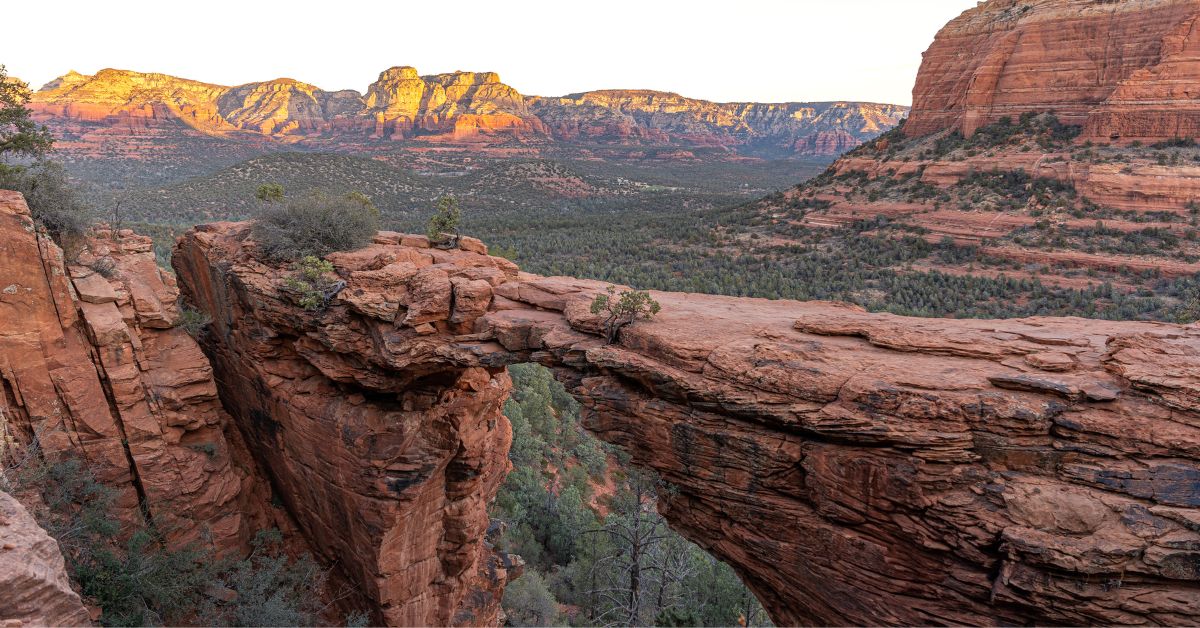
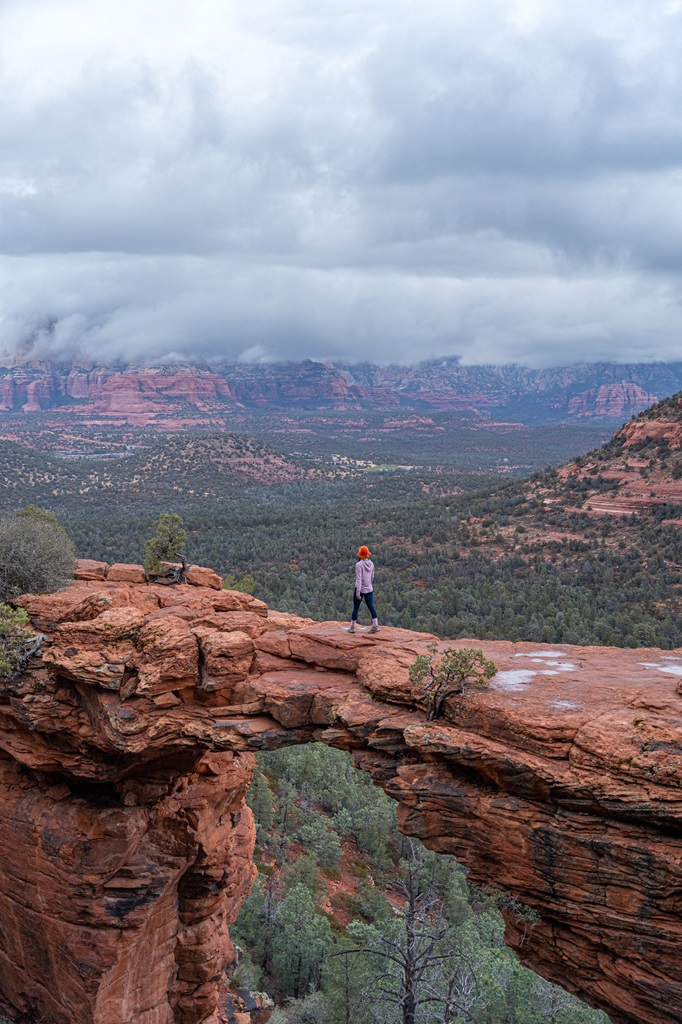
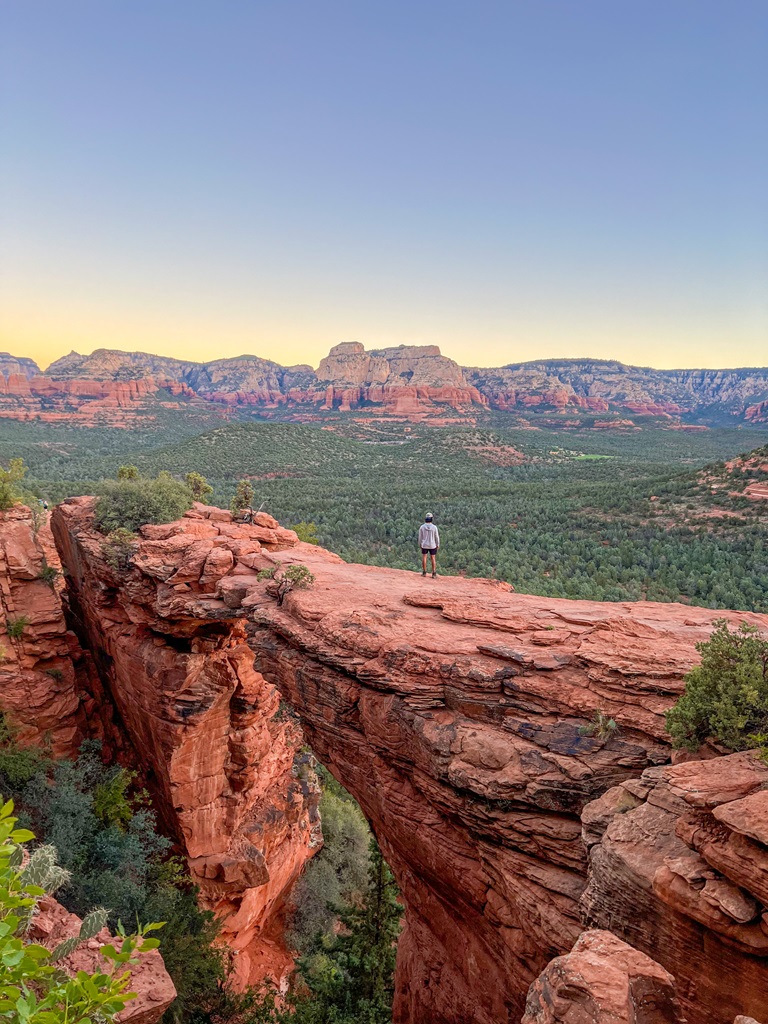
It stands at an impressive height of 54 feet and offers panoramic views of the surrounding red rock landscape, making it a popular spot for photography and hiking enthusiasts.
Devil’s Bridge Sedona is a must-see spot when visiting this area!
🌲 Take the Sedona Cares Pledge and follow Leave No Trace principles.
Best Time to Hike Devil’s Bridge
The best times to hike Devil’s Bridge are typically in the spring (March to May) and fall (September to November).
During these months, the weather is usually perfect for hiking and other outdoor activities.
✨ READ THIS: Best Hikes in Sedona, Arizona
This is also peak season for Sedona so expect Devil’s Bridge to be swarmed with lots of people – hiking early or later in the day will help avoid crowds.
Seasonal Considerations
🍂 Fall (September – November)
This is a popular time to visit Sedona due to ideal weather conditions making it perfect for outdoor adventures.
❄️ Winter (December – February)
This season is probably my favorite time to explore Sedona because the crowd-level is at its lowest.
As I mentioned above, my husband and I have hiked to Devil’s Bridge three times.
Two times were in January.
If you really want to kick the crowds to the curb, visit this spot during the winter months, on a weekday, and start the hiking before sunrise.
⚠️ If there’s snow or ice on the Devil’s Bridge Trail, exercise caution and use good judgment – slippery conditions can make this hike dangerous!
🌷 Spring (March – May)
This season offers pleasant temperatures and beautiful desert blooms, but trails will be busy as it’s a popular time to visit Sedona.
☀️ Summer (June – August)
Visiting Sedona in the summer is not recommended due to extreme heat.
Most of the Devil’s Bridge Trail is exposed and challenging with a short yet steep climb.
This combination can increase the risk of dehydration and heat-related illness.
🥵 Follow these tips to stay safe in the summer:
- Start early in the morning or later in the day to avoid peak heat
- Bring plenty of water – more than you think you’ll need
- Wear sun-protective clothing like a hat, sunglasses, and lightweight clothing and apply sunscreen
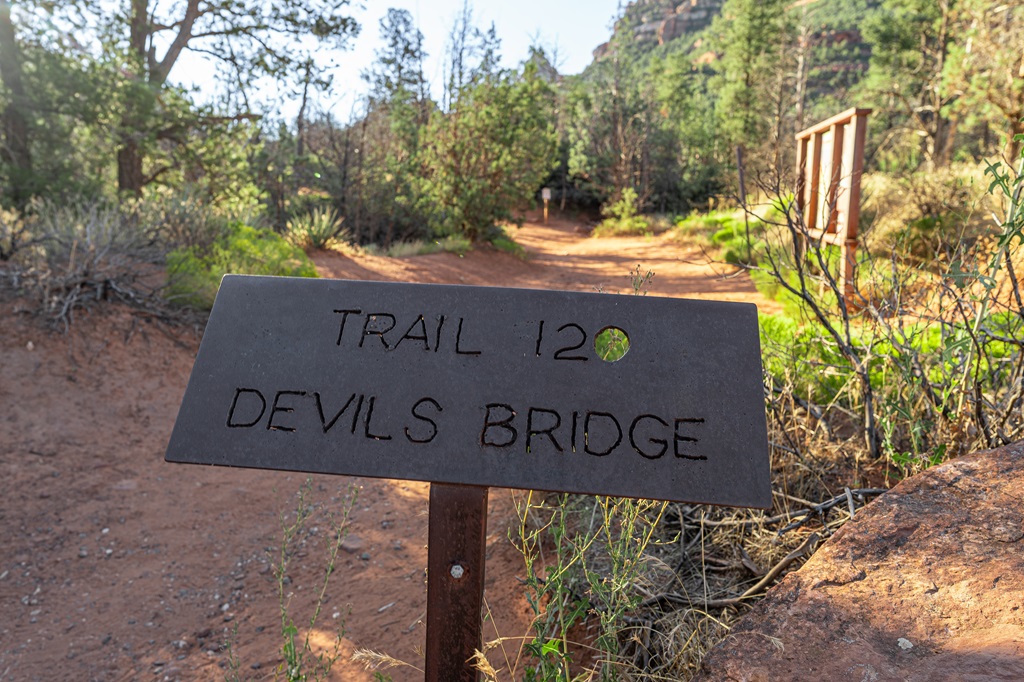
Devil’s Bridge Hiking Routes + Trail Maps
The official Devil’s Bridge Trailhead starts along the unpaved portion of Dry Creek Road (FR 152) and requires a high clearance, 4×4 vehicle to access.
If you don’t have a high-clearance vehicle, you can park at either the Dry Creek Vista Trailhead or the Mescal Trailhead.
Or you can take the free Sedona Shuttle to either of those last two trailheads.
There is overflow parking along Boynton Pass Road near the Mescal Trailhead if both trailhead parking areas are full.
There are three different routes you can take to reach Devil’s Bridge.
Below I have described the routes in more detail.
I highly recommend taking either the Mescal Trail or the Chuckwagon Trail rather than hiking along Dry Creek Road which is meant for high clearance, 4×4 vehicles.
⚠️ Before visiting, check for any trail condition updates or alerts HERE!
Mescal Trail
The Mescal Trailhead is located off Long Canyon Road in Sedona.
Length: 4 miles
Elevation Gain: 530 feet
Hiking Time: 2 to 2.5 hours
Route Type: Out-and-back
Difficulty Rating: Moderate to hard
Pet-friendly? Yes, must be on leash
Chuckwagon Trail
The Dry Creek Vista Trailhead is located at the end of Dry Creek Road off Boynton Pass Road.
Length: 6 miles
Elevation Gain: 730 feet.
Hiking Time: 3 to 4 hours
Route Type: Out-and-back
Difficulty Rating: Moderate to hard
Pet-friendly? Yes, must be on leash
Dry Creek Road
With a high clearance, 4×4 vehicle, this hike starts at the Devil’s Bridge Trailhead.
Without a high clearance 4×4 vehicle, this hike starts at the Dry Creek Vista Trailhead.
Length: 4 miles (or 2 miles with a high clearance, 4×4 vehicle)
Elevation Gain: 530 feet
Hiking Time: 2 to 2.5 hours (or 1 hour with a high clearance, 4×4 vehicle)
Route Type: Out-and-back
Difficulty Rating: Moderate to hard
Pet-friendly? Yes, must be on leash
🎟️ Unlike other popular trails in the Sedona area, the trailheads for Devil’s Bridge, including Dry Creek Vista Trailhead and Mescal Trailhead, do NOT require a Red Rock Pass.
Devil’s Bridge Shuttle
Parking at the Dry Creek Vista Trailhead and Mescal Trailhead are limited, making it a challenge during peak times.
To make your visit smoother, Sedona provides a convenient free shuttle service that takes you from a designated park-and-ride location in central Sedona directly to either one of the trailheads.
This service operates year-round from Thursday to Sunday, running from 7 AM to 5:30 PM.
Best of all, parking at the park-and-ride location is free, and no reservations are required for the shuttles, allowing you to focus on enjoying the stunning scenery without the hassle of parking worries.
Find more information on shuttle schedules for Dry Creek Vista and Mescal trailheads HERE.
Devil’s Bridge Hike: Step-by-Step Directions
Start From Mescal Trailhead
Start your hike from the Mescal Trailhead parking lot on Long Canyon Road and follow the Mescal Trail as it leads you into the woods.
Before you know it, you’ll hit the end of the Mescal Trail and find yourself on the Chuckwagon Trail.
Keep following the Chuckwagon Trail until you reach a junction.
Go straight as you cross Dry Creek Road to reach the official Devil’s Bridge Trailhead (and parking area for high clearance, 4×4 vehicles).
Trail directions continue below…
Start From Dry Creek Vista Trailhead
The National Forest Service does not recommend hiking along the Dry Creek Road as it is supposed to be for high clearance, 4×4 vehicles.
A lot of people take this route because if you Google “Devil’s Bridge hike” or “Devil’s Bridge Sedona”, AllTrails is one of the first links to pop up and their most popular route is Devil’s Bridge Trail via Dry Creek Road.
If you do decide to hike along Dry Creek Road, simply follow the road until you reach an intersection where you will find the official Devil’s Bridge Trailhead to the right.
Please be on the lookout for vehicles as you hike along the road!
For a more scenic and safer route, I recommend taking the Chuckwagon Trail from the Dry Creek Vista Trailhead.
Follow the trail until you reach a junction.
⚠️ The Chuckwagon Trail is also open to mountain bikers. Keep an eye out for them and share the trail!
Keep right to stay on the Chuckwagon Trail.
The trail to the left leads to the Mescal Trailhead.
You will soon reach another junction in the trail.
Go straight as you cross Dry Creek Road to reach the official Devil’s Bridge Trailhead (and parking area for high clearance, 4×4 vehicles).
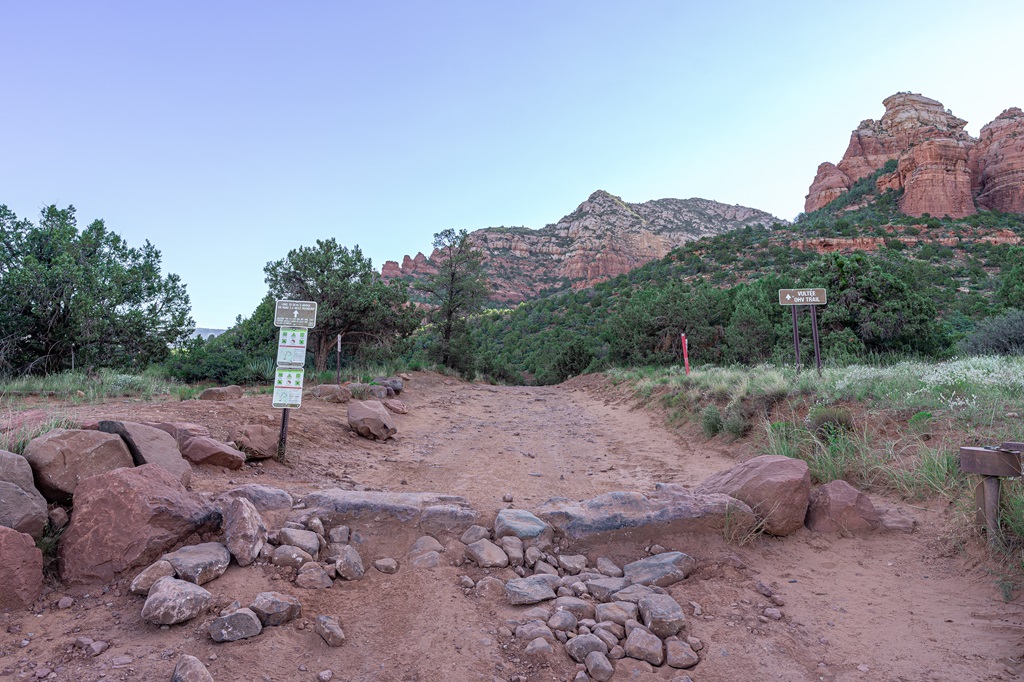
Official Devil’s Bridge Trailhead
From the parking area of Devil’s Bridge Trailhead, you only have one more mile!
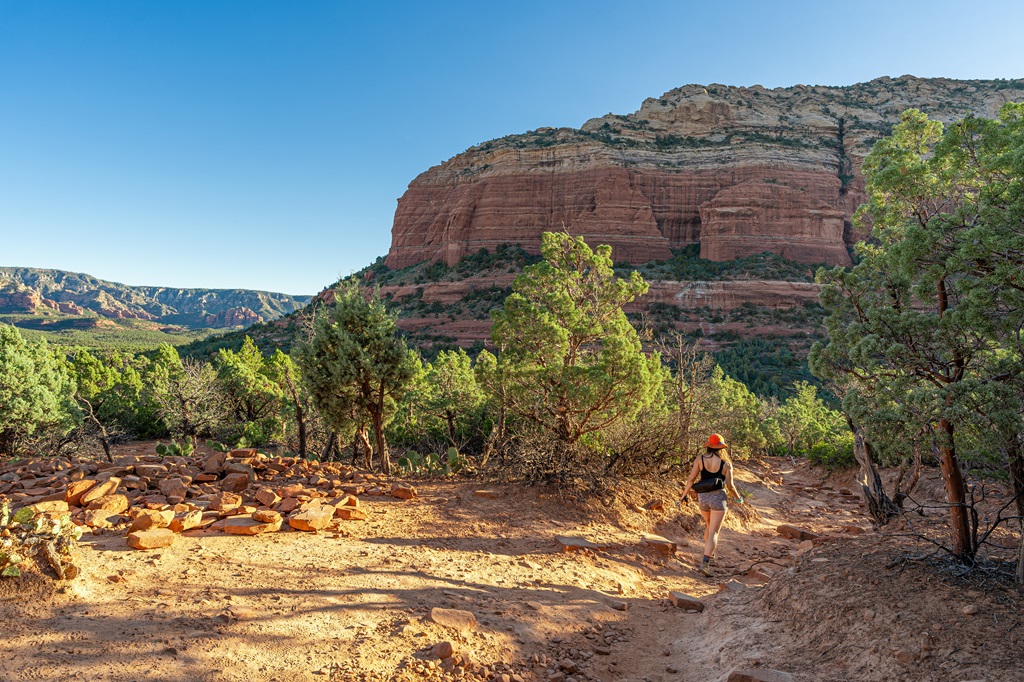
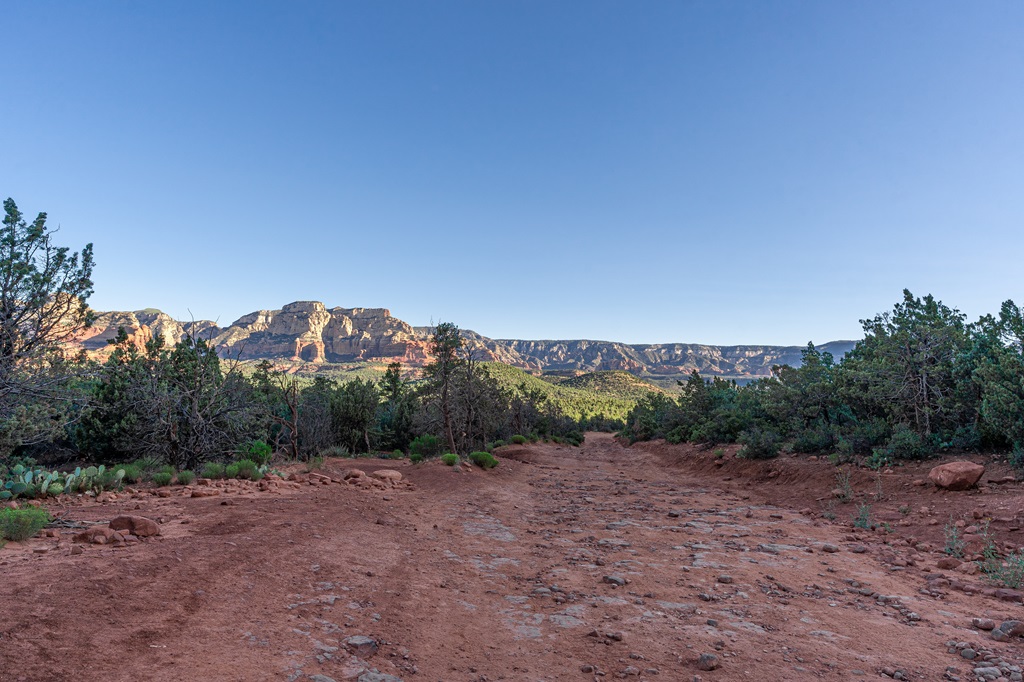
The Devil’s Bridge Trail follows an old dirt road built for jeeps through washes filled with juniper and prickly pear cacti.
As you get closer to Devil’s Bridge, the trail becomes steeper and steeper.
Thankfully the views along the way are incredible and worth the effort!
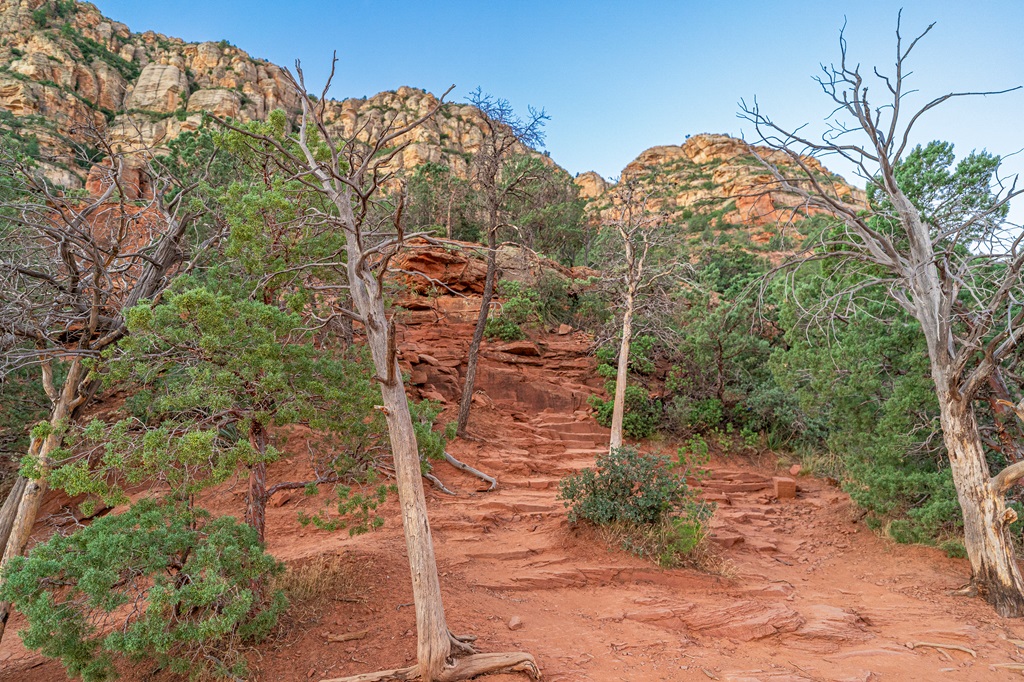
Final Ascent (steep!)
As you continue, Devil’s Bridge Trail narrows and you will navigate up sets of steep, rocky steps.
It’s a rewarding challenge that brings you closer to the stunning views ahead!
Keep going, you’re almost there!

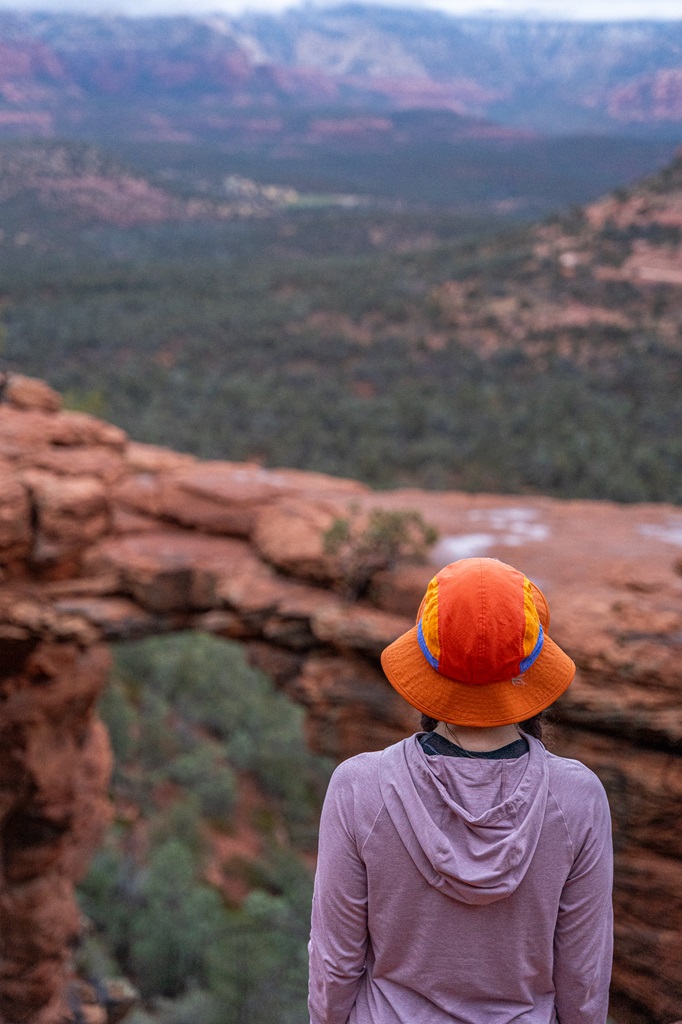
Devil’s Bridge
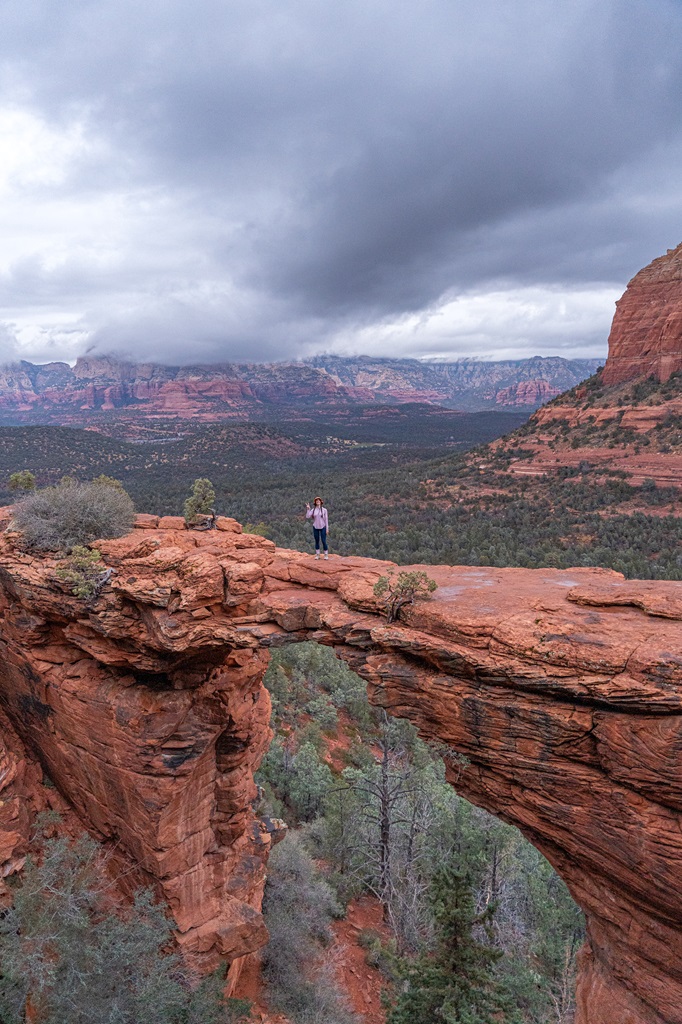
Finally! The infamous natural sandstone arch known as Devil’s Bridge.
Time to take some pictures and relax for a bit.
If you are not extremely afraid of heights, take a walk across the bridge.
It’s not as narrow as it looks!
However, don’t act silly and get too close to the edge.
Accidents can happen, so stay safe!
To return to the parking area, simply retrace your steps.
Congrats, you did it! 🥳
✨ READ THIS: Best Sunrise Hikes in Sedona with Epic Views
Tips for Hiking Devil’s Bridge
1. Start Early: Beat the crowds and enjoy cooler temperatures by starting your hike early in the morning, especially during peak season.
✨ READ THIS: 15 Ways to Avoid Crowds in the Great Outdoors
2. Bring Plenty of Water and Snacks: Carry plenty of water to stay hydrated, especially in the summer. Also, bring high-energy snacks to refuel and help maintain your energy during the hike.
3. Footwear and Gear: Some sections of this trail can be rocky, so wear comfortable, sturdy hiking shoes (or boots). And wear proper clothing for the season and bring layers just in case.
4. Be Physically Prepared: For the most part, this hike isn’t too tough, until you reach the final 0.5 miles – this section is steep with lots of tall, uneven steps.
5. Pack the 10 Essentials:
- Navigation – A map, compass, or GPS device to help you stay on course and find your way in unfamiliar terrain.
- Water – Sufficient water to stay hydrated, along with a filtration system or purification tablets if you plan to refill from natural sources.
- Food – Energy-rich snacks or meals to keep your energy levels up during the hike.
- First-Aid Kit – A basic first-aid kit with items like bandages, antiseptic, pain relievers, and any personal medications you may need.
- Sun Protection – Sunscreen, sunglasses, and a sun hat to protect yourself from harmful UV rays.
- Insulation – Extra layers of clothing (such as a down jacket or fleece) to stay warm in changing weather conditions.
- Rain Gear and Emergency Shelter – A rain jacket or poncho and an emergency bivy sack or space blanket for shelter in case of sudden weather changes.
- Fire – A lighter, matches, or fire starter to help you build a fire for warmth or signaling in case of emergency.
- Multi-tool or Knife – A versatile tool or knife to handle any tasks, from preparing food to making repairs.
- Headlamp/Flashlight – A reliable light source with extra batteries, in case you end up hiking in the dark or need it for emergency situations.
Discover More Great Hikes in Sedona
- Cathedral Rock – This is a short but steep hike to one of the most magical spots in Sedona. Also, it’s an incredible spot to watch the sunset!
- Birthing Cave – Hike a short distance to a uniquely shaped cave. This spot has a blend of natural beauty and profound cultural significance!
- Soldiers Pass Trail – This trail is perfect for families and beginners plus it’s pet-friendly! You’ll encounter remarkable features like Devils Kitchen Sinkhole, the Seven Sacred Pools, and the intriguing Soldiers Pass Cave.
- Keyhole Cave – Tackle this off-the-beaten-path hike to one of Sedona’s largest caves, offering an adventurous challenge for experienced hikers.
- Fay Canyon Arch – The Fay Canyon Trail is a true gem in Sedona, perfect for those seeking a short, scenic hike. The true highlight is the Fay Canyon Arch, a natural arch-shaped rock formation hidden along a side trail.
- Subway Cave – Take a short detour off the Boynton Canyon Trail to explore one of Sedona’s most popular caves. This adventure offers stunning red rock views, a fun scramble, and a touch of history with ancient Sinagua ruins.
- Wilson Mountain – If you’re up for a challenging climb with unmatched scenery and fewer crowds, tackle this hike to the tallest peak in Sedona!
- Bear Mountain – This is Sedona’s toughest hike, with nearly 2,000 feet of steep elevation gain in just 2.3 miles. The trail offers breathtaking views throughout, showcasing Sedona’s iconic red rock formations and the distant San Francisco Peaks.
- Doe Mountain – This is a short, scenic hike to stunning views that are even more spectacular at sunrise – plus there’s a chance to see hot air balloons!
Conclusion
Devil’s Bridge is one of the most amazing geological landmarks in Sedona!
Each route leads to the same breathtaking reward – a chance to stand atop Sedona’s largest natural sandstone arch.
Always remember to follow Leave no Trace principles and help protect this beautiful spot!
If this guide inspires you to hike Devil’s Bridge in Sedona, I’d love to hear about your adventure.
Leave a comment and share your experience!
Enjoyed this post? Pin for later!