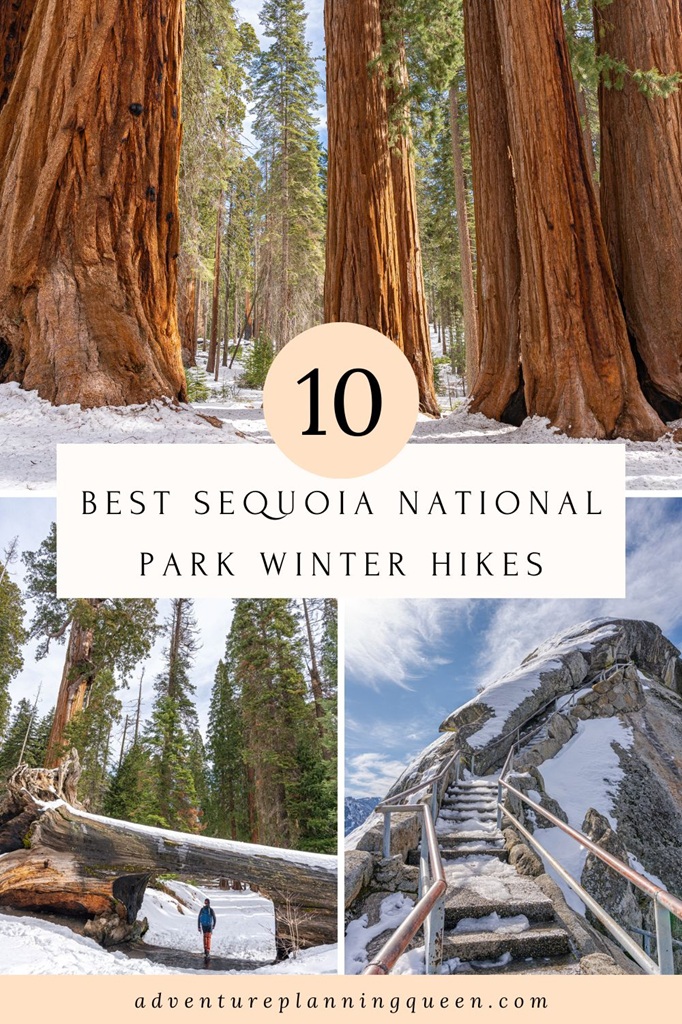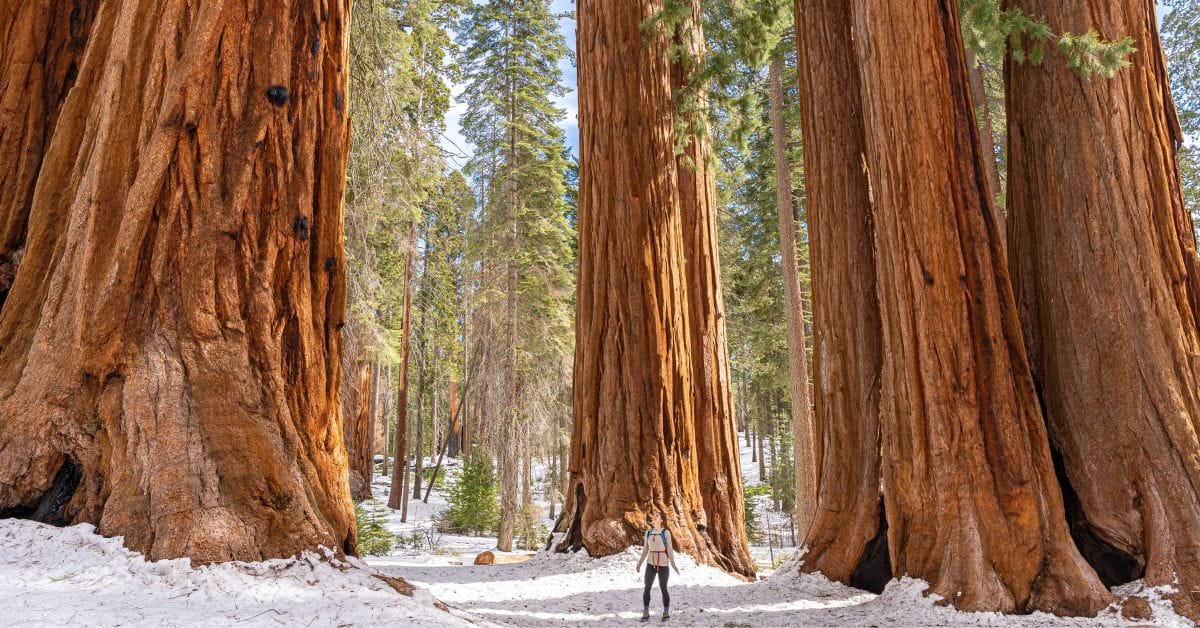
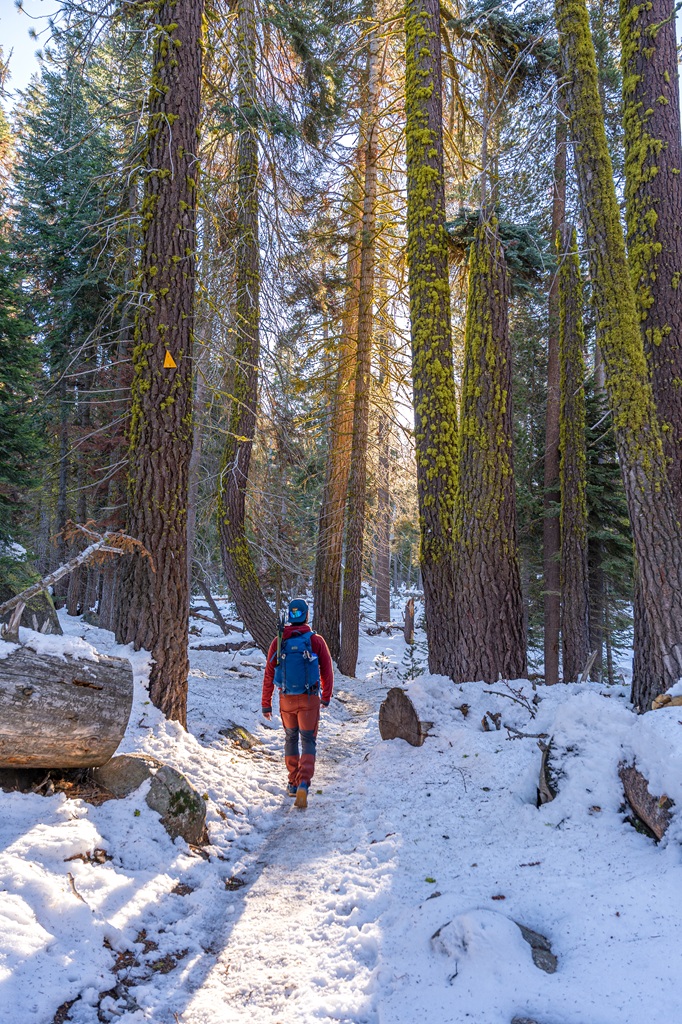
Winter hiking in Sequoia National Park feels like stepping into a snow globe. You’ll experience quiet trails, giant sequoia trees dusted in snow, and way fewer crowds than the busy season.
There’s a variety of winter tails in Sequoia. You’ll find everything from easy, beginner-friendly hikes to more challenging routes for experienced winter adventurers. ⛷️
If it’s your first winter visit, head straight to the Giant Forest area. It’s packed with stunning trails like General Sherman Tree, Congress Trail, Crescent Meadow Loop, and Big Trees Trail.
In other areas you’ll also find higher-elevation routes with deeper snow that are perfect for snowshoeing and cross country skiing. Just make sure you know your limits, check conditions, and come prepared! Winter hiking is incredible, but it demands preparation to stay safe.
Read on for my full guide to the 10 best winter hikes in Sequoia National Park and start planning your snowy adventure! ❄️
Affiliate Disclaimer: Some links on this page may be affiliate links, meaning I may earn a small commission at no extra cost to you. As an Amazon Associate, I earn from qualifying purchases. Thanks for supporting the blog! 🫶
Sequoia in Winter: Quick Overview
🎟️ Sequoia’s Entrance Fee
Entrance to Sequoia National Park costs $35 per vehicle for a 7-day pass. However, if you have the America the Beautiful Annual Pass, your entry is free!
For those who love exploring national parks, investing in the Annual Pass is a smart choice. At just $80, it grants you access to over 2,000 federal recreation sites across the country!
FEE UPDATES! Beginning January 1, 2026, non-U.S. residents (without an annual pass) will pay a $100 per person in addition to the standard entrance fee. The Annual Pass for non-US. residents will cost $250.
🌨️ Winter Weather in Sequoia National Park
Winter in Sequoia National Park can be so much fun but be prepared for the weather! Temperatures can change 20–30 degrees just by driving up or down the mountain.
It might feel mild and comfortable in the foothills, but once you reach the giant sequoia groves, you could be dealing with freezing temperatures and snow.
The Giant Forest area (home to the General Sherman Tree, Moro Rock, Lodgepole, and Wuksachi) sits between 5,000 and 7,000 feet in elevation. That higher elevation is why it sees true winter conditions.
Down in the foothills, areas like Potwisha Campground, Buckeye Flat, and Hospital Rock sit around 4,000 feet and see warmer temperatures with little to no snow.
From November through March, you can expect cold temperatures, snow, and icy roads – especially in the Giant Forest and Lodgepole. This area averages about 40–45 inches of precipitation each year, with most of it falling in winter. That’s what creates the deep snowpack that often sticks around until May!
❄️ Average winter temperatures in the Giant Forest area:
- November: 50°F high / 31°F low (10°C high / -1°C low)
- December: 44°F high / 27°F low (7°C high / -3°C low)
- January: 42°F high / 24°F low (6°C high / -4°C low)
- February: 44°F high / 25°F low (7°C high / -4°C low)
- March: 46°F high / 26°F low (8°C high / -3°C low)
Keep in mind, conditions can change fast. Clear blue skies can turn into a snowstorm quickly, and chain restrictions are common throughout winter.
Always check Sequoia’s weather forecast before heading up and carry tire chains with you!
🛣️ Sequoia Road Conditions and Closures in Winter
Winter can seriously impact roads in Sequoia National Park, and closures typically happen sometime between November and May (exact dates vary depending on conditions).
Some roads may close temporarily during or after storms, even if they’re normally open in winter.
⛔ Seasonal road closures in Sequoia:
- Generals Highway between Sequoia and Kings Canyon
- Moro Rock / Crescent Meadow Road
- Mineral King Road
- Crystal Cave Road
- Road to the main Sherman Tree Trailhead parking area
✅ For the most up-to-date road conditions, call (559) 565-3341 (press 1, then 1).
⛓️ Tire Chains and Chain Control in Sequoia
If you’re visiting in winter, assume you may need tire chains. When chain control is in effect, you must carry chains in your vehicle, even if you have AWD/4WD or snow tires.
Chain control levels:
- R1 – Chains or traction devices required, unless you have snow-tread tires on at least two drive wheels.
- R2 – Chains required, unless you have AWD/4WD and snow-tread tires on all four wheels.
- R3 – Chains required on all vehicles, no exceptions.
✅ Pro tip: Buy or rent chains ahead of time, make sure they fit your tires, and practice putting them on before your trip.
☃️ Sequoia Winter Travel Tips
- Expect slower travel due to icy and snow-covered roads.
- Bring tire chains, make sure they fit, and know how to use them.
- Pack plenty of layers – temperatures can drop quickly, especially at higher elevations.
- Be aware that daylight hours are shorter during the winter months.
- Expect traffic congestion and limited parking during winter holidays (Christmas and New Years in late December/early January and President’s Day in mid-February)
- Keep emergency supplies in your car (water, snacks, blankets, flashlight, extra warm clothing).
- There is no lodging open inside Sequoia National Park this winter so plan to stay in Three Rivers near the Ash Mountain Entrance for the most convenient access.
- Free winter shuttles in the Giant Forest and Lodgepole areas operate on limited dates (Nov 27–30, Dec 24–Jan 1, Jan 17–18, Feb 14–15 for the 2026 season) from 10:00 am–4:30 pm, so check schedules and plan ahead.
Best Winter Hikes in Sequoia National Park
I’ve put together a list of the best Sequoia National Park winter hikes so you can easily find the ones that match your skill level and what kind of adventure you’re looking for.
Honestly, you can’t go wrong with any of them! Just be realistic about your skills and come prepared.
Some of these trails may be doable with just good waterproof boots and microspikes, while others are better suited for snowshoes or cross country skis.
Check conditions, bring the right gear, and pick the hike that fits you best! 👇
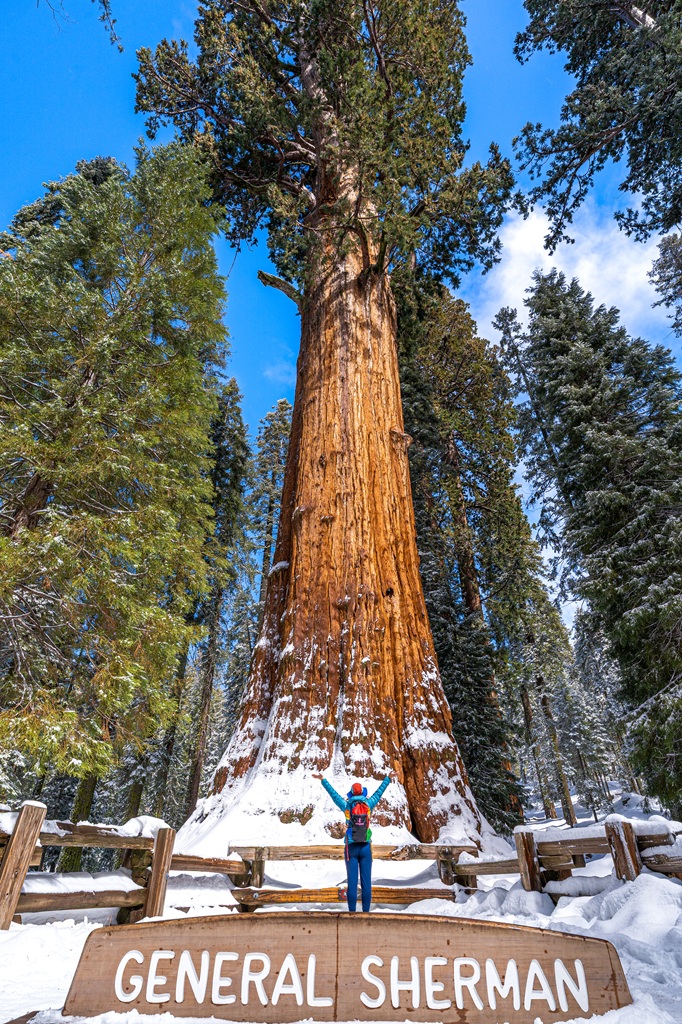
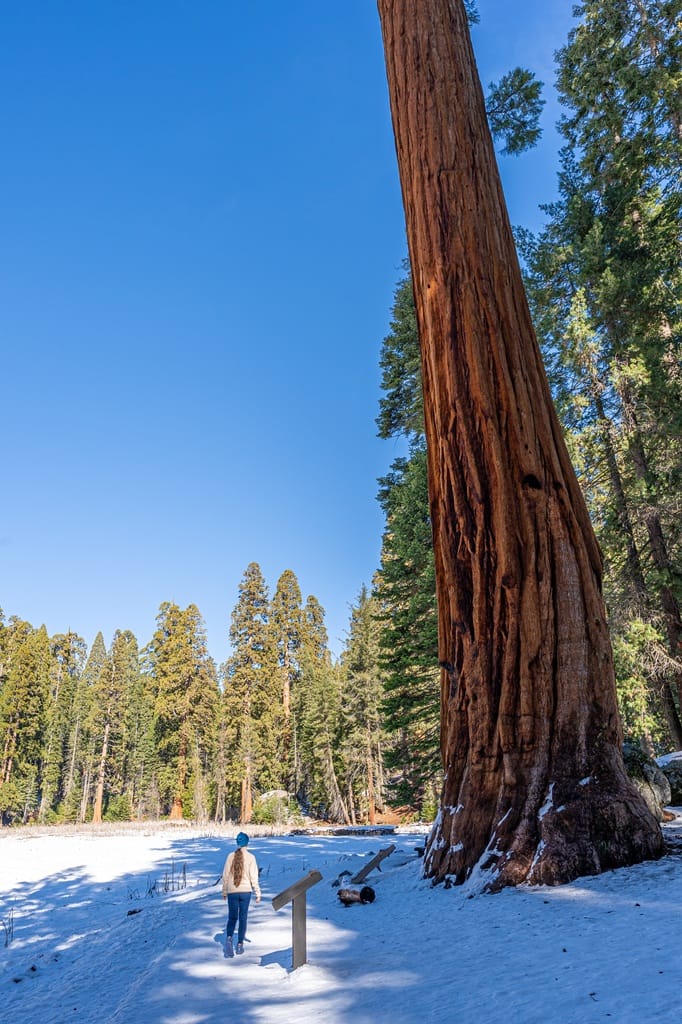
General Sherman Tree Trail
Starting Point: General Sherman Accessible Parking Lot
Length: 0.3 miles roundtrip
Elevation Gain: 50 feet
Difficulty: Easy
Hiking Time: 10-20 minutes
Route Type: Lollipop
Pet-friendly? No, pets are not allowed
Hike Features: General Sherman Tree
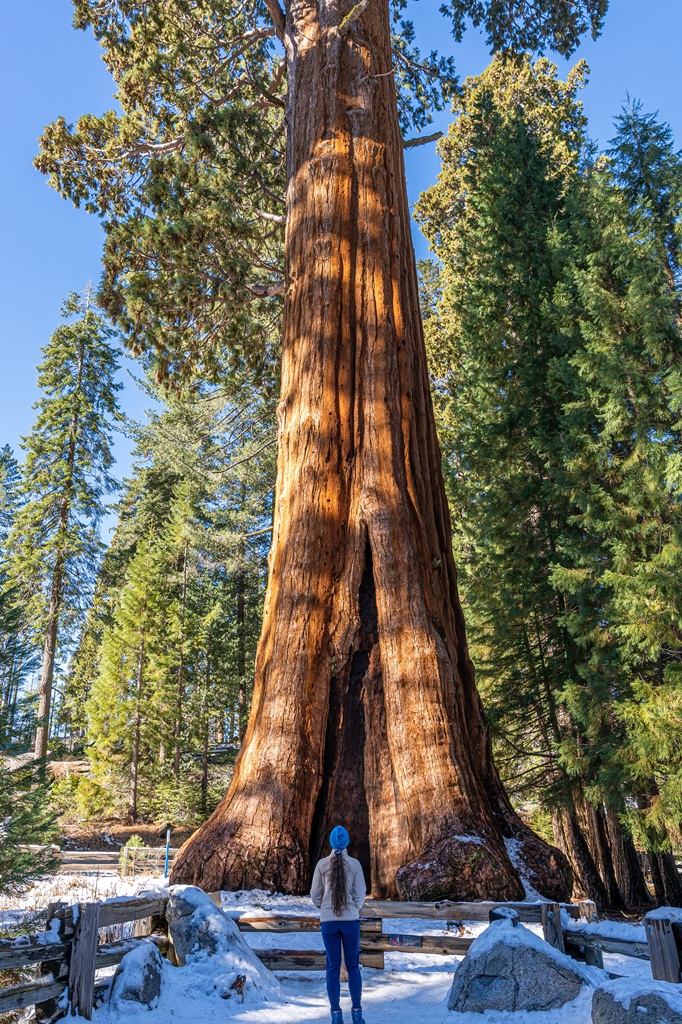
The General Sherman Tree is a must-see in Sequoia National Park! It stands over 275 feet tall, measures more than 36 feet in diameter at the base, and weighs close to 1,400 tons.
Estimated to be over 2,000 years old, it was officially named the largest tree by volume in 1931. It continues to grow, adding enough wood each year to equal a new 60-foot-tall tree.
During the winter months, the main Sherman Tree parking lot closes due to snow, so all visitors must use the smaller accessible parking area off Generals Highway. In other seasons, this lot is reserved for those with a disability placard, but in winter, it’s open to everyone.
It’s a small lot with very limited parking spots, so plan to arrive early. Restrooms are available here as well.
From the parking area, follow the paved path to the General Sherman Tree. This trail can get icy in the winter so bring traction devices for your shoes to avoid slipping.
There’s a prime photo spot near the base of the tree, and yes, there’s often a line. One important reminder – please don’t cross the fence! The barriers are there to protect the tree and its fragile root system so this giant sequoia can remain standing for generations to come.
If you’re up for a longer walk, the Congress Trail begins just past General Sherman and winds deeper into the giant sequoia grove.
Congress Trail

Starting Point: General Sherman Accessible Parking Lot
Length: 2 miles roundtrip
Elevation Gain: 350 feet
Difficulty: Moderately challenging
Hiking Time: 1 to 1.5 hours
Route Type: Lollipop
Pet-friendly? No, pets are not allowed
Hike Features: Chief Sequoyah, The President Tree, The Senate Group, The House Group, McKinley Tree, and other unique giant sequoias
✨ READ THIS: General Sherman Tree and Congress Trail Hiking Guide
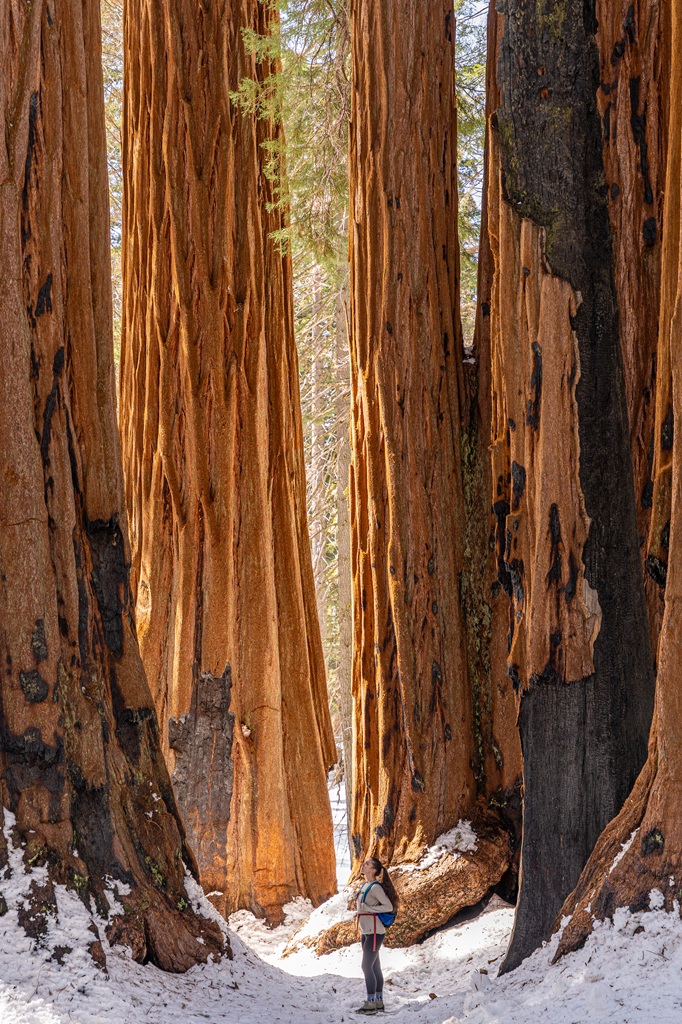
This scenic loop winds through the heart of the Giant Forest and passes many stunning giant sequoia trees.
🌳 Congress Trail highlights include:
- The President Tree – The third-largest tree in the world and believed to be around 3,200 years old.
- Chief Sequoyah – The ninth-largest tree in the Giant Forest, named in honor of the Cherokee leader who created the Cherokee syllabary.
- The Senate Group and The House Group – Towering clusters of giant sequoias named in the 1920s.
- McKinley Tree – Standing over 240 feet tall, this massive sequoia sits near a five-way junction along the trail and is easy to spot thanks to its impressive height.
- Room Tree – A hollow giant sequoia you can actually step inside. The opening at the base was naturally formed by fire damage over time (not carved out).
In the winter months, the main Sherman Tree parking lot closes due to snow, so everyone must park in the smaller accessible lot off Generals Highway. During the rest of the year, this lot is reserved for visitors with a disability placard, but in winter, it’s open to everyone.
It’s a small parking area with limited spots, so arriving early is your best bet. Restrooms are also available at this location.
If you want to experience giant sequoias without the heavy crowds, this is easily one of the best and most peaceful walks in Sequoia National Park. 😌
Moro Rock

Starting Point: Giant Forest Museum
Length: 3.8 miles roundtrip
Elevation Gain: 475 feet
Difficulty: Moderate to hard
Hiking Time: 2 to 2.5 hours
Route Type: Out-and-back
Pet-friendly? No, pets are not allowed
Hike Features: Moro Rock, 350+ steps, stunning views from the top
✨ READ THIS: Moro Rock Hiking Guide
Moro Rock is one of Sequoia’s most iconic landmarks! Sitting at 6,725 feet, this massive granite dome offers incredible 360° views on a clear day.
It was formed millions of years ago from cooled underground magma and has slowly been exposed as erosion stripped away softer rock above it.
In winter, access gets a little trickier. Moro Rock / Crescent Meadow Road closes, so you’ll need to park in the big lot across from the Giant Forest Museum and hike the Moro Rock Trail or follow the closed road to reach it.
The stairway to the summit of Moro Rock may be closed due to dangerous ice buildup. You can hike it when conditions allow (before major snowstorms or after ice melts), but if snow and ice are present, it can be extremely slippery and hazardous.
If Moro Rock is closed, a great alternative is Hanging Rock Trail, a short and moderately challenging hike nearby that still delivers amazing views, plus a giant boulder that looks like it’s balancing right on the edge.
Just remember to wear traction devices on your shoes if needed, avoid cliff edges when icy, and always know your limits!
Big Trees Trail
Starting Point: Giant Forest Museum
Length: 1.2 miles roundtrip
Elevation Gain: 105 feet
Difficulty: Easy
Hiking Time: 30 minutes to 1 hour
Route Type: Loop
Pet-friendly? No, pets are not allowed
Hike Features: Sentinel Tree, Clara Barton Tree, giant sequoia trees, and Round Meadow
This paved, family-friendly trail offers several educational displays focusing on the giant sequoia ecosystem. It passes by the Giant Forest Museum, Sentinel Tree, Clara Barton Tree, Round Meadow, and young giant sequoia trees.
It is relatively flat, paved, and has benches along the way. Informational displays offer insight into what you are experiencing. Watch for yellow-bellied marmots, bears, and other wildlife.
Outside of winter, the small parking lot at the trailhead is reserved for visitors with disability placards. However, in the winter months, it’s open to everyone.
If that lot happens to be full, there’s a larger parking area across the street from the Giant Forest Museum. From here, it’s a short walk to the Big Trees Trail Trailhead.
The trail itself is completely paved but be aware that when snow/ice is present on the trail then it is no longer wheelchair friendly.
Tokopah Falls Trail

Starting Point: Tokopah Falls Trailhead in the Lodgepole Campground
Length: 4 miles roundtrip
Elevation Gain: 540 to 600 feet
Difficulty: Moderately challenging
Hiking Time: 2 to 2.5 hours
Route Type: Out-and-back
Pet-friendly? No, pets are not allowed
Hike Features: The Watchtower, Tokopah Valley, Marble Fork of the Kaweah River, and Tokopah Falls
✨ READ THIS: Tokopah Falls Hiking Guide
If you’re looking for one of the best hikes in Sequoia National Park, the Tokopah Falls Trail is definitely worth adding to your list.
Located in the Lodgepole area, this trail offers incredible scenery – even more incredible when covered in a blanket of snow!
The route follows the Marble Fork of the Kaweah River as it winds through a beautiful canyon. Along the way you’ll walk beside a rushing creek, pass towering granite walls, and hike through peaceful pine forest.
At the end of the trail, you’ll reach Tokopah Falls – a stunning 1,200-foot waterfall cascading down a granite cliff.
The trailhead is located in the Lodgepole Campground near the Lodgepole Visitor Center. The main trailhead parking lot is closed in the winter, but you can park at the visitor center. Just keep in mind this adds a little extra distance, making the hike about 5.2 miles roundtrip.
I personally haven’t hiked this trail in winter, but some reports mention potential avalanche risk after fresh snowfall. If you’re considering a winter trek, do your research, carry the proper gear, and consider taking an avalanche awareness course.
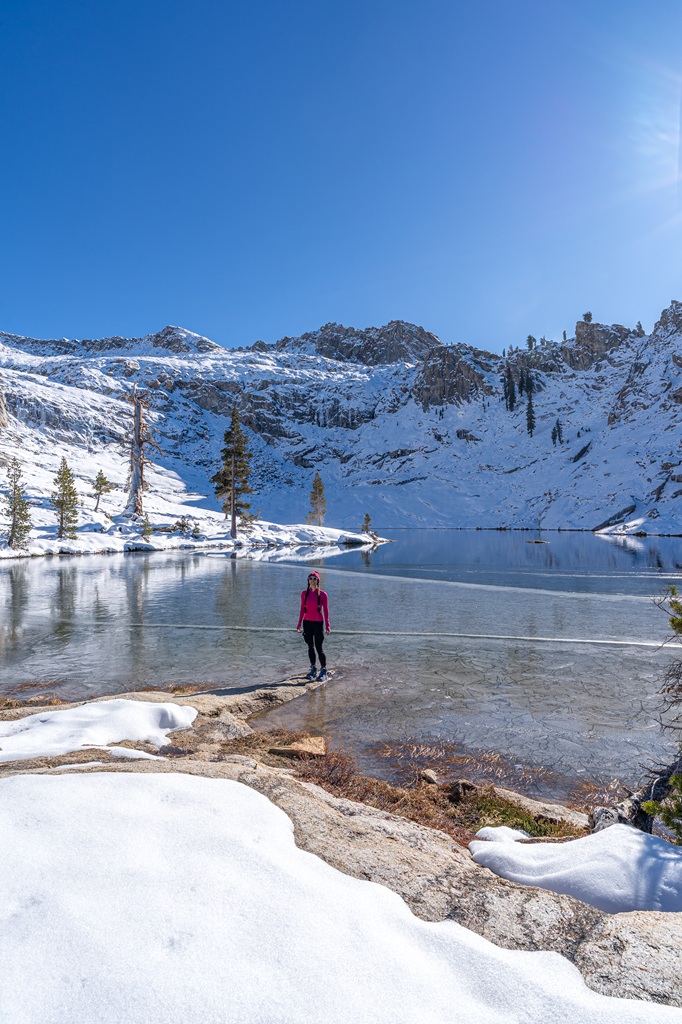
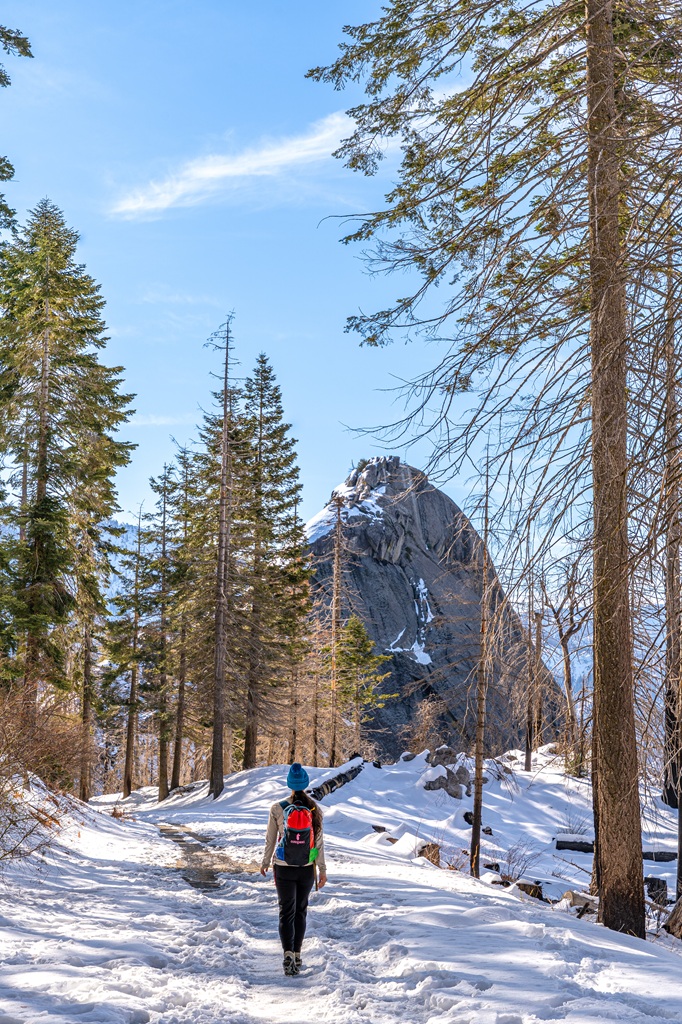
Heather Lake via Lakes Trail
Starting Point: Wolverton Trailhead (Lakes Trail Trailhead)
Length: 8 miles roundtrip
Elevation Gain: 2,430 feet
Difficulty: Challenging
Hiking Time: 5 to 6 hours
Route Type: Out-and-back
Pet-friendly? No, pets are not allowed
Hike Features: Heather Lake
✨ READ THIS: Lakes Trail Hiking Guide
Sitting at an elevation of 9,280 feet and surrounded by snow-covered granite peaks, Heather Lake is the first lake you’ll reach along the Lakes Trail in Sequoia National Park.
In winter, the trail is often fairly easy to follow, especially if other hikers have already packed it down. Just make sure you bring the right gear depending on conditions, such as microspikes, snowshoes, or even skis if there’s a lot of snow.
You’ll follow the Lakes Trail most of the way, but you’ll eventually reach a split between the Watchtower Trail and the Hump Trail.
In winter, the Watchtower Trail is closed due to dangerous conditions, so you’ll need to take the Hump Trail. This trail eventually merges back into the Lakes Trail.
Once you reach the lake, take some time to enjoy the quiet winter scenery. Just avoid walking out onto the frozen lake. Ice thickness can vary a lot, and it’s generally not something you want to risk!
The Lakes Trail begins from the Wolverton Trailhead (or Lakes Trail Trailhead) located in the Lodgepole area. There is a big parking area at the trailhead. Just make sure the road is open and don’t forget to carry tire chains.
Pear Lake via Lakes Trail
Starting Point: Wolverton Trailhead (Lakes Trail Trailhead)
Length: 13 miles roundtrip
Elevation Gain: 3,200 feet
Difficulty: Challenging
Hiking Time: 7 to 9 hours (or can be an overnight trip)
Route Type: Out-and-back
Pet-friendly? No, pets are not allowed
Hike Features: Heather Lake, Aster Lake, Emerald Lake, and Pear Lake
Pear Lake sits high in the alpine at about 9,550 feet and is the final destination along the Lakes Trail. Reaching it in winter is a serious adventure, but the views and remote alpine setting make it well worth the effort.
Getting there usually requires snowshoes or cross country skis since the snowpack at that elevation can be very deep. This route isn’t recommended for beginners – it’s a long trip with a good bit of elevation gain, and avalanche hazards can exist along parts of the trail.
As mentioned above, this hike begins from the Wolverton Trailhead located at the end of Wolverton Road. Simply follow the Lakes Trail, hop on the Hump Trail, and merge back onto the Lakes Trail. You will pass several lakes before reaching Pear Lake, including Heather Lake, Aster Lake, and Emerald Lake.
Some adventurers stay the night at the Pear Lake Winter Hut, a backcountry hut designed for experienced winter travelers.
Weather in the High Sierra can change quickly, and low clouds or whiteouts can make navigation difficult. Start early, carry proper winter survival gear, and only attempt if you’re comfortable traveling in avalanche terrain and understand avalanche safety.
The last time my husband and I hiked this trail was in November 2025. It was after a snowstorm and the landscape was transformed into a winter wonderland! We were able to make it to Pear Lake with just hiking boots and microspikes (thanks to others breaking the trail). It was an awesome experience!
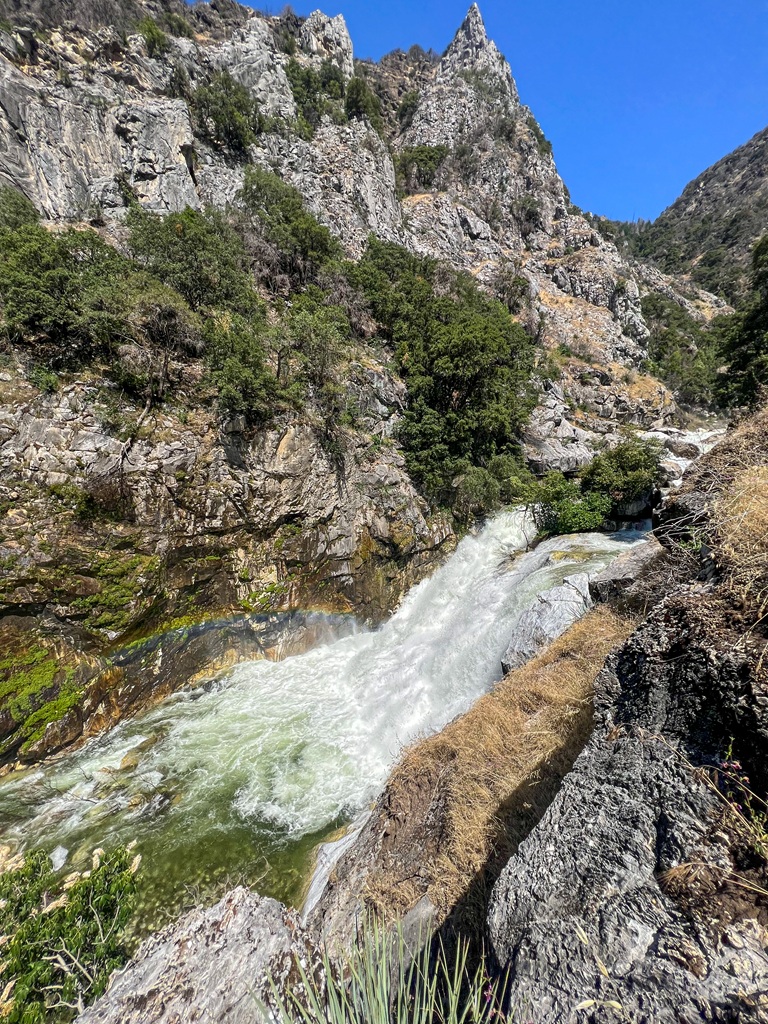
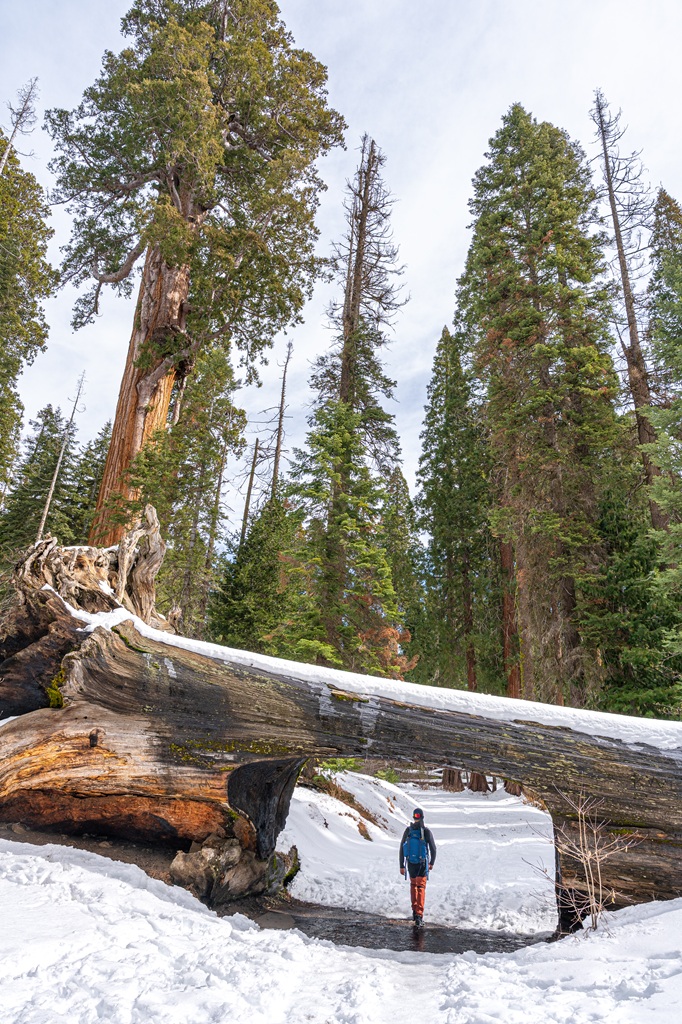
Marble Falls Trail
Starting Point: Potwisha Campground
Length: 6.5 miles roundtrip
Elevation Gain: 1,500 feet
Difficulty: Moderate to hard
Hiking Time: 3.5 to 4.5 hours
Route Type: Out-and-back
Pet-friendly? No, pets are not allowed
Hike Features: Marble Falls
The hike to Marble Falls is a great winter option in the foothills of Sequoia National Park. This trail winds through a deep canyon filled with chaparral and woodlands, passing oaks, cottonwoods, redbuds, and dogwoods along the way.
As you climb the switchbacks, you’ll start to hear the Marble Fork of the Kaweah River rushing through the canyon. Near the end of the trail, the terrain levels out and you’ll reach Marble Falls – a series of cascades with a cumulative drop of 510 feet.
To reach the trailhead, park near site #14 at Potwisha Campground. If that area is full, there’s additional parking across Generals Highway in the Potwisha Overflow Parking Lot.
I’ve only hiked this trail once in the summer and the heat was brutal, so winter seems like one of the best times to do it.
Just keep in mind that even though this area sits at a lower elevation than most hikes in the park, snow and ice can still be present on the trail. Check conditions ahead of time and be prepared with the right gear!
Crescent Meadow Loop
Starting Point: Giant Forest Museum
Length: 6.5 to 7 miles roundtrip
Elevation Gain: 1,000 feet
Difficulty: Moderate
Hiking Time: 3.5 to 4.5 hours
Route Type: Lollipop
Pet-friendly? No, pets are not allowed
Hike Features: Giant sequoias, Tunnel Log, Crescent Meadow, and Tharp’s Log
✨ READ THIS: Crescent Meadow Loop Hiking Guide
Visiting Crescent Meadow in winter feels like a completely different experience. The crowds disappear and the entire area turns into a quiet winter wonderland surrounded by giant sequoias.
Microspikes can be helpful if the trail is packed and slick, while snowshoes and cross country skis are great after fresh snowfall.
In winter, Moro Rock / Crescent Meadow Road is closed to vehicles. To reach the trailhead, start at the Giant Forest Museum and follow the closed road about 2.6 miles to the Crescent Meadow Trailhead.
From there, take the High Sierra Trail briefly until it connects with the Crescent Meadow Loop Trail. The loop around the meadow is 1.3 miles, or about 1.8 miles if you include the detour to Tharp’s Log.
I recommend the latter if you have the time! Tharp’s Log is a hollowed-out sequoia log that was once used as a cabin, and it’s pretty cool to see.
This route is designated for cross country skiers, but snowshoers and hikers are welcome too. Just be sure not to walk or snowshoe directly on ski tracks since that can damage them and create hazards for skiers.
Sunset Rock
Starting Point: Giant Forest Museum
Length: 1.6 miles roundtrip
Elevation Gain: 150 feet
Difficulty: Easy
Hiking Time: 30 minutes to 1 hour
Route Type: Out-and-back
Pet-friendly? No, pets are not allowed
Hike Features: Beautiful views from Sunset Rock
Starting from the Giant Forest Museum parking lot, the Sunset Rock Trail is a short hike through a beautiful mixed-conifer forest filled with red firs, Jeffrey pines, sugar pines, and incense cedars.
The trail leads to a large granite dome known as Sunset Rock. From the top, you’ll get sweeping views of the deep canyon carved by the Kaweah River. It’s a great spot to watch sunset! Hence the name.
In winter, the trail may be covered in snow or ice, so microspikes, snowshoes, or maybe even skis may be needed.
Always check trail conditions before heading out and bring proper winter gear. If you’re planning to stay for sunset, don’t forget a headlamp for the hike back.
Tips for Tackling Sequoia National Park Winter Hikes
1. Check Road Status: Some roads in Sequoia National Park are closed during the winter seasons and others may close temporarily after a snowstorm. When roads are open, snow/ice may be present so drive cautiously and use tire chains when required.
⚠️ Before heading out, always check road status information online and call (559) 565-3341 (press 1, then 1) for current road conditions.
2. Always Carry Tire Chains: If you’re visiting Sequoia in winter, you’re required to carry tire chains in your vehicle whenever snow is possible. They help your car maintain traction on snowy or icy roads.
Chains come in different sizes, so make sure yours fit your tires and that you know how to install them before your trip. Chain controls are common from November through March, but they can start earlier or last later depending on weather.
3. Download Offline Maps: Snow can bury sections of trail, especially at higher elevations, making navigation more difficult. Download offline maps on your phone before entering the park and bring a paper map and compass as backup.
4. Check the Weather Forecast: Winter weather in the Sierra Nevada can change quickly. Always check the forecast before your hike and avoid heading out during storms or heavy snowfall.
5. Winter Trail Closures: Most trails in Sequoia remain open in winter, but conditions can vary widely. Some trails may be icy, snow-covered, or temporarily closed due to hazardous conditions.
⚠️ Always check trail conditions before heading out.
6. Start Your Winter Hike Early: Snow travel is slower than hiking on dry trails, and winter days are much shorter. Starting early gives you plenty of daylight and helps you avoid hiking in the dark. Always pack a headlamp just in case!
7. Know Your Limits and Skill Levels: Just because a trail in the winter is open doesn’t mean it’s 100% safe. Deep snow, icy sections, and avalanche hazards can make some routes much more challenging. Bring the right gear, know your skill level, and don’t hesitate to turn around if conditions feel unsafe.
8. Dress for Winter Conditions: Bring plenty of layers and use proper layering techniques to regulate your body temperature. Sweating too much can actually make you colder once you stop moving.
9. Be Bear Aware: Black bears are active within Sequoia National Park. Follow these guidelines to avoid any negative interactions with a black bear.
🐻 Note: bear spray is prohibited in Sequoia!
10. Respect Nature: Follow Leave No Trace principles – plan ahead, pack out all trash, avoid disturbing wildlife, be considerate of others, and respect the natural beauty of Sequoia National Park.
Essential Gear for Winter Hikes in Sequoia National Park
Some winter hikes in Sequoia National Park may not require any special gear, depending on trail conditions.
Other times you may need microspikes or snowshoes, and for more advanced winter adventures, skis might be necessary.
Here’s a list of winter hiking essentials:
🎒 Backpack – A pack around 22–30 liters works well to carry layers, snacks, water, and gear. I’ve been using the Cotopaxi Luzon Del Dia 24L Pack and my husband uses the REI Co-op Trail 25L Pack.
🥾 Winter Boots – Waterproof, insulated boots are a must!
🧊 Microspikes – Bring a pair of microspikes if you’re visiting in the winter and you’re planning to hike along icy trails. They will give you good traction to avoid slipping! I use Black Diamond Access Spike Traction Device.
❄️ Snowshoes – Best used when hiking on deep, soft, or loose snow, usually anything over six inches, to prevent sinking, also known as postholing.
☃️ Gaiters – Keep snow out of your boots when snowshoeing or hiking in deep snow.
🥢 Trekking Poles – Essential for stability on snow and slippery trails. I use REI Co-op Trailmade Trekking Poles and love them!
🧥 Warm Layers (top) – Pack a moisture-wicking base layer, a fleece mid-layer, an insulated jacket, and an outer shell to protect you from the elements, such as rain, snow, and wind. Check out my favorite tops 👇
- Base layer: REI Co-op Midweight Long-Sleeve Base Layer
- Fleece mid layer: Cotopaxi Teca Fleece Full-Zip Jacket
- Down mid layer: Cotopaxi Fuego Hooded Down Jacket
- Outer shell: Patagonia Torrentshell 3L Jacket
👖 Warm Layers (bottom) – Pack a breathable base layer, fleece-lined mid-layer, and soft-shell pants. A pair of hard-shell pants might be overkill but depends on the conditions and the winter adventure you plan to go on. My favorite fleece bottoms are the Baleaf Fleece Jogger Pants and the Baleaf Fleece Leggings.
🤠 Warm Hat/Beanie – Keeps your head and ears warm on cold winter hikes. My favorite beanie is the Cotopaxi Tozo Beanie!
🧦 Socks – Moisture-wicking, quick-drying socks are the way to go. My favorite pair of hiking socks are Darn Tough Hiker Micro Crew Cushion Socks. I’m obsessed with them!
🥶 Emergency Shelter – Pack an emergency bivy sack or space blanket for shelter in case of sudden weather changes.
🗺️ Navigation – Carry a physical topographic map, compass, a satellite messenger (or personal locator beacon), and download offline maps to help you stay on course, find your way in unfamiliar terrain, and call for help if needed.
🔦 Headlamp/Flashlight – A reliable light source with extra batteries, in case you end up hiking in the dark or need it for emergency situations.
🩹 First-Aid Kit – A basic first-aid kit with items like bandages, antiseptic, pain relievers, and any personal medications you may need.
💧 Water – Water bottles to carry sufficient water to stay hydrated, along with a filtration system or purification tablets if you plan to refill from natural sources.
🍕 Food – Energy-rich snacks or meals to keep your energy levels up during the hike.
😎 Sun Protection – Sunscreen, sunglasses, and a sunhat to protect yourself from harmful UV rays, even when it’s cloudy. Also, polarized sunglasses are important when it’s bright outside and the ground is covered in snow/ice.
🔥 Fire – A lighter, matches, or fire starter to help you build a fire for warmth or signaling in case of emergency. Along with matches, I also carry a multi-tool carabiner that has a fire starter, utility blade, screwdriver, and bottle opener.
🗡️ Multi-Tool and Repair Kit – A versatile tool/knife and repair kit to handle any task, from preparing food to making repairs.
🚙 Winter Car Kit – Pack a basic winter car kit, including blankets or sleeping bags, extra warm layers, ice scraper, small shovel, extra water, snacks, flashlights, portable power bank with chargers, and signaling devices. Just in case you get stranded or caught in an unexpected winter storm!
Conclusion
Winter transforms Sequoia National Park into a magical snow-covered landscape. Towering giant sequoias dusted in snow, peaceful forest trails, and stunning mountain views make winter one of the most beautiful times to explore the park!
From easy strolls like the Big Trees Trail to longer adventures like the Lakes Trail, there are plenty of incredible winter hikes in Sequoia.
With the right gear, preparation, and awareness of winter conditions, hiking in Sequoia during the colder months can be an unforgettable adventure.
If this guide inspires you to tackle any of these incredible Sequoia National Park winter hikes, I’d love to hear about your experience! Leave a comment and share your adventures.
Enjoyed this post? Pin for later!