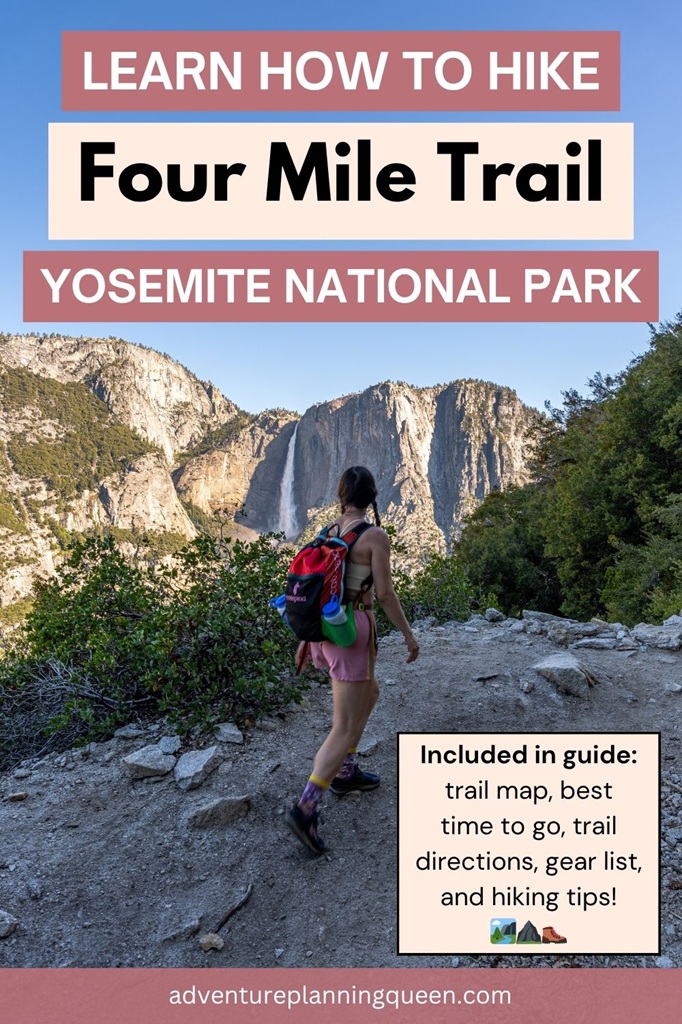
The Four Mile Trail is a Yosemite classic but don’t let the name fool you. It’s actually closer to 5 mile (8 km) one way but nevertheless a stunning hike.
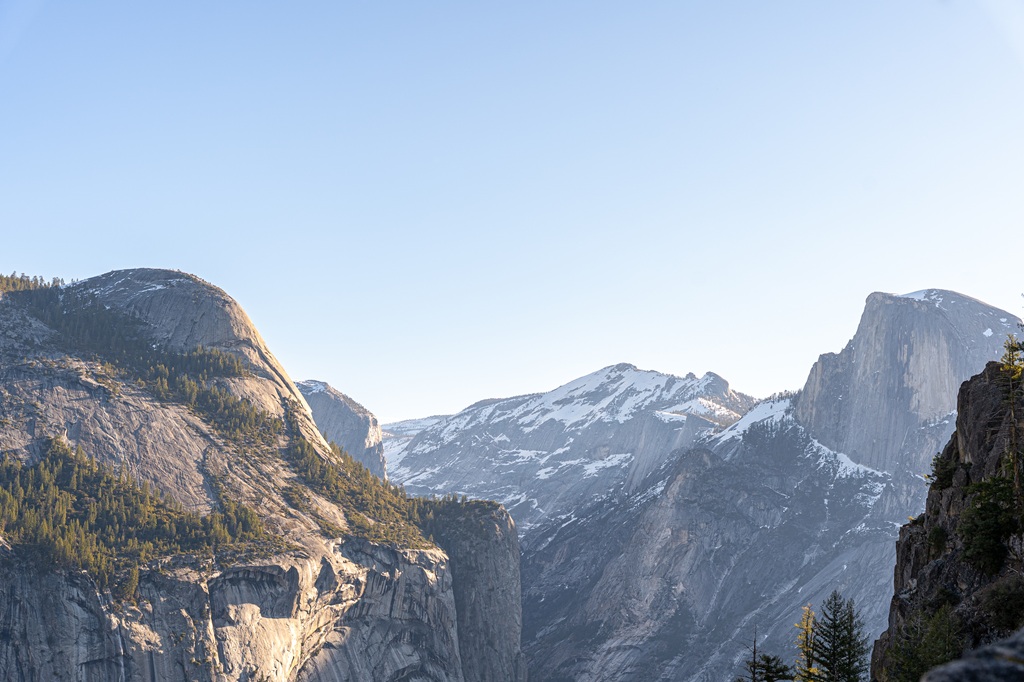
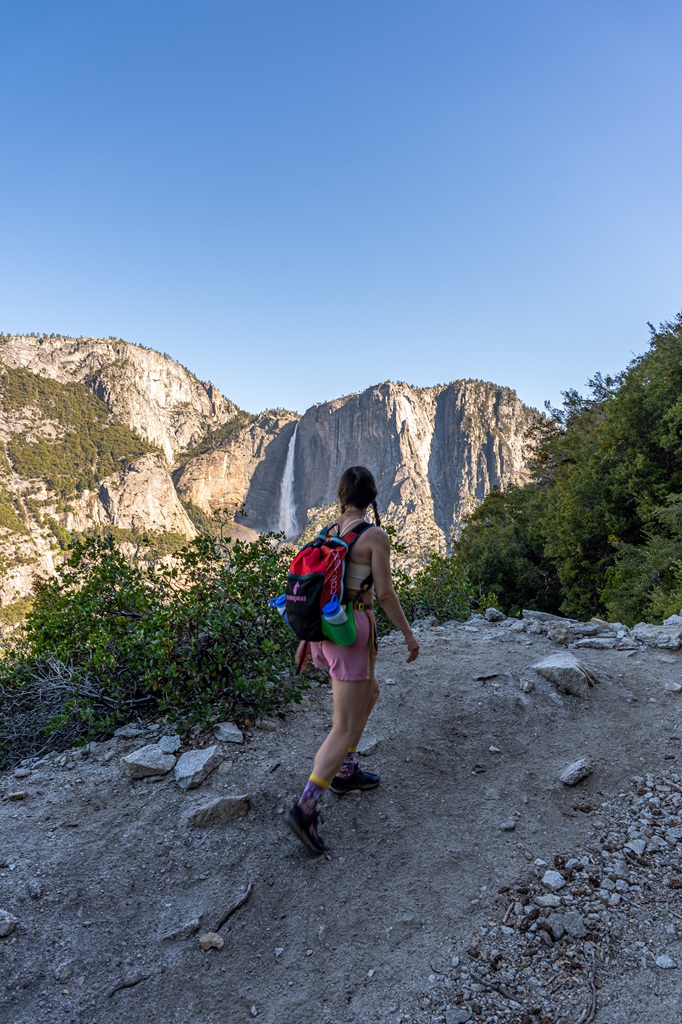
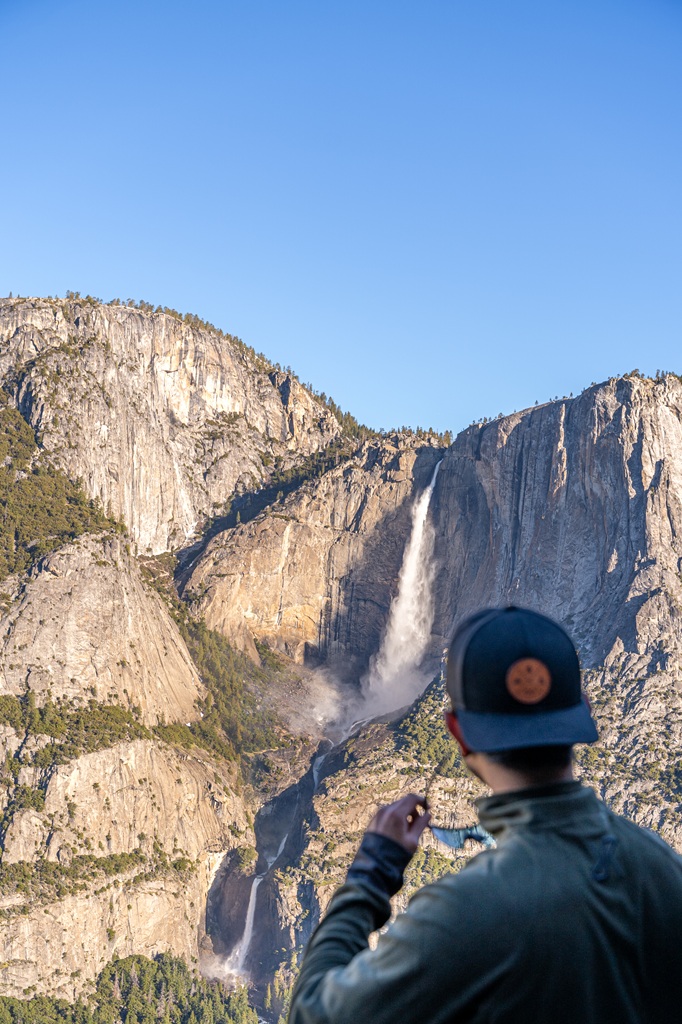
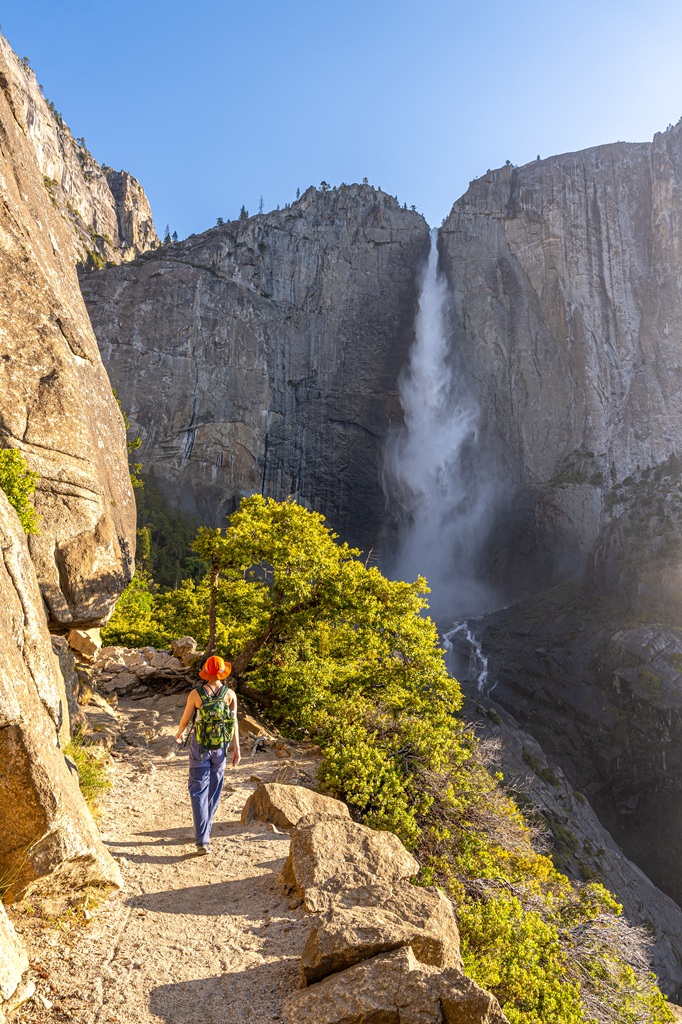
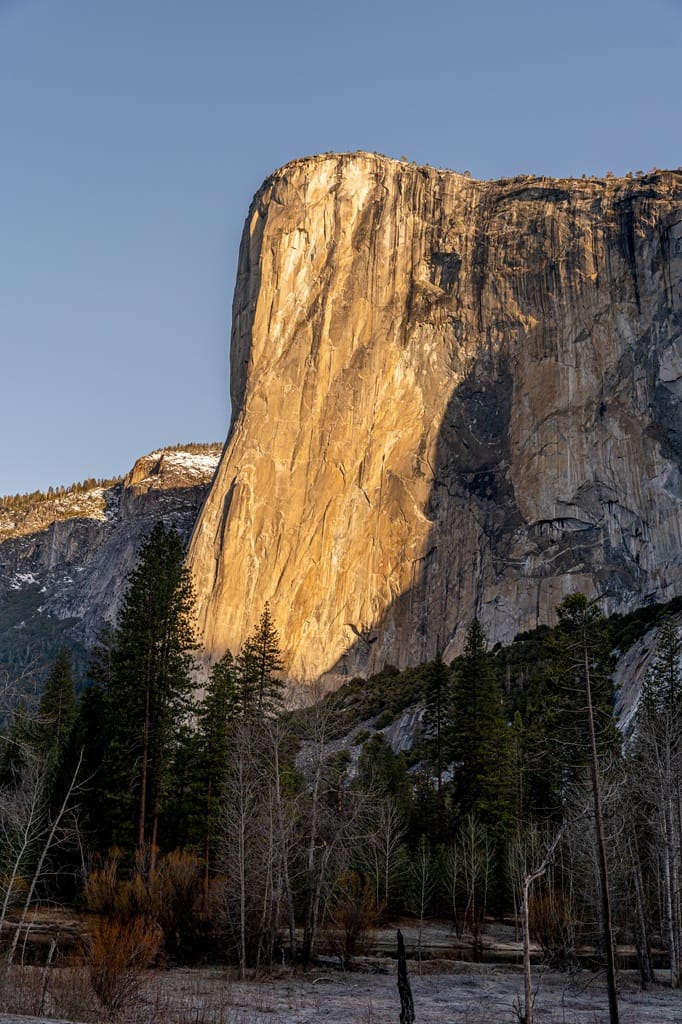
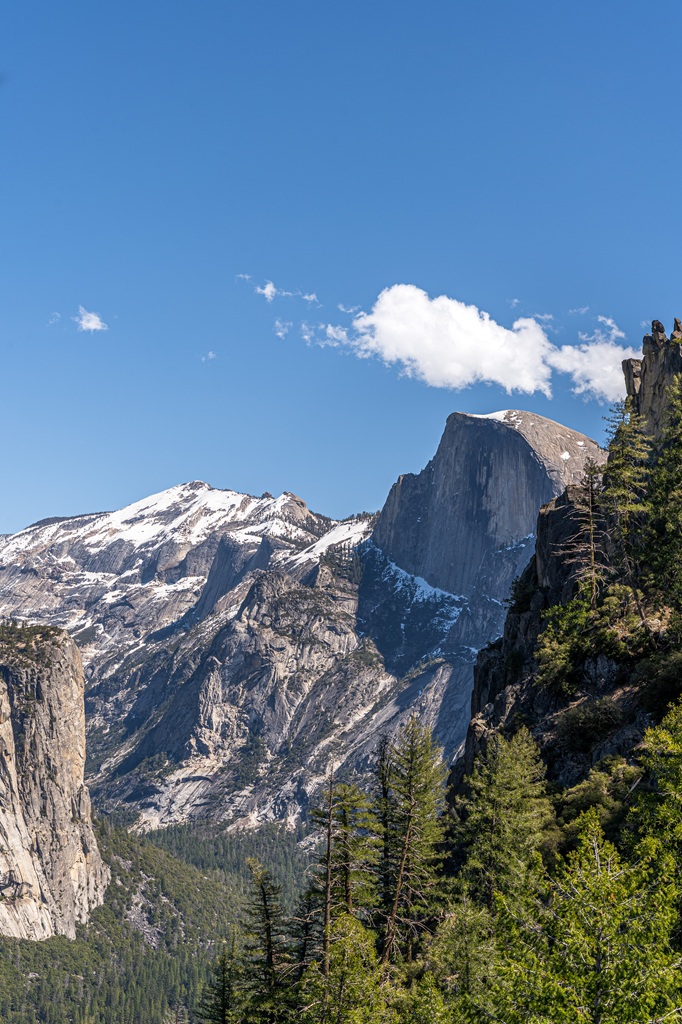
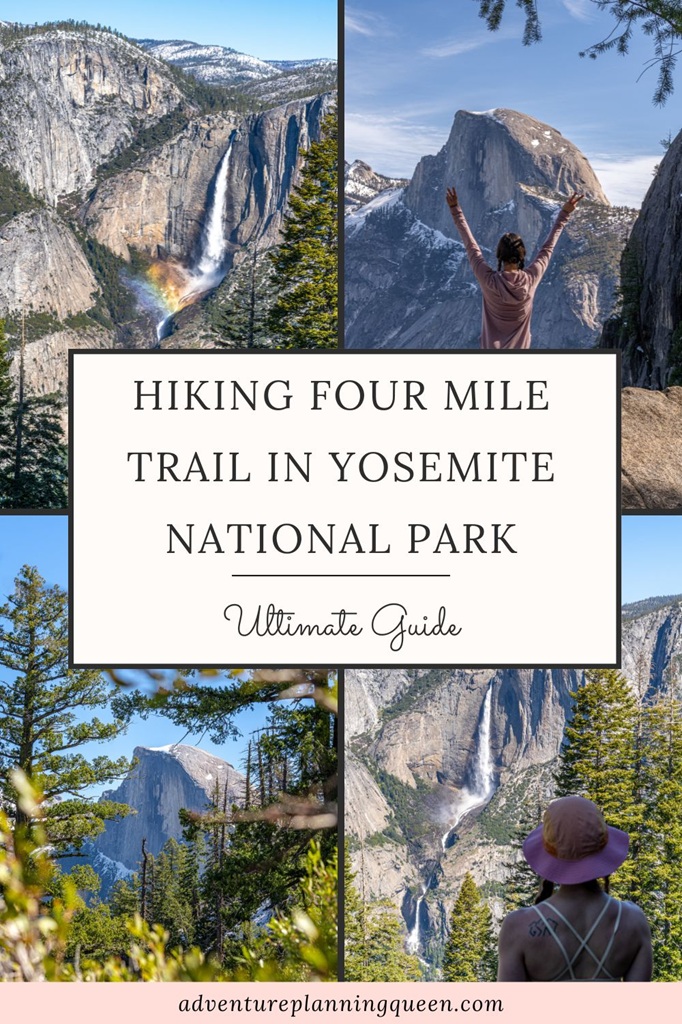
This steep, switchback-filled trail climbs over 3,400 feet from the Yosemite Valley floor to Glacier Point, offering nonstop views of iconic landmarks, including El Capitan, Cathedral Rocks, Sentinel Rock, Yosemite Falls, and Half Dome. 😍
The trail, originally a 4-mile toll route, was built in 1872 by John Conway. Later on, it was rerouted which is why it’s a bit longer in distance.
The Four Mile Trail is a must-do hike for epic Yosemite views. Read this hiking guide for everything you need to know before hitting the trail, including route tips, seasonal advice, and how to plan transportation.
Affiliate Disclaimer: Some links on this page may be affiliate links, meaning I may earn a small commission at no extra cost to you. As an Amazon Associate, I earn from qualifying purchases. Thanks for supporting the blog! 🫶
- Four Mile Trail Stats and Map
- Four Mile Trailhead and Parking
- Best Time to Hike the Four Mile Trail in Yosemite National Park
- Four Mile Trail to Glacier Point: Step-by-Step Directions
- More Hiking Routes via Four Mile Trail
- Tips for Hiking the Four Mile Trail in Yosemite National Park
- What to Bring to Yosemite National Park
- Conclusion
Yosemite National Park Trip Info
📍 Location: California, USA
🗓️ Best Time to Visit: Year-round but most accessible time is May-October
🏞️ Ideal Trip Length: 3-5 days
✈️ Closest Airport: Fresno Yosemite International (2.5 hours away from Yosemite Valley)
🏨 Where to Stay: Yosemite Valley Lodge and Curry Village in Yosemite Valley, Tenaya at Yosemite in Fish Camp, Yosemite View Lodge in El Portal, Best Western Plus Yosemite Gateway Inn in Oakhurst, or Rush Creek Lodge in Groveland
🚙 Getting Around: Rent a vehicle from rentalcars.com or discovercars.com
💵 Entrance Fee: $35 per vehicle (7 days) or buy an America the Beautiful Pass (covers the entrance fee for 1 year). There are new non-resident fees – learn more here
🤩 Check out my Yosemite National Park Guide for more travel, hiking, and seasonal guides
Four Mile Trail Stats and Map
A portion of the Four Mile Trail is closed in winter due to snow and ice resulting in treacherous conditions. But when it’s open and snow-free, it’s an incredibly rewarding challenge.
You can hike it one way or roundtrip. If you’re hiking it one way, be aware that there is no free shuttle service from Yosemite Valley to Glacier Point. There is a reservable tour bus with limited departure times.
Plan ahead and be prepared!
Four Mile Trail Stats
Length: 9.8 miles (15.8 km) roundtrip
Elevation Gain: 3,420 feet
Difficulty: Challenging
Hiking Time: 6 to 8 hours
Route Type: Out-and-back
Pet-friendly? No
Wheelchair Accessible? No
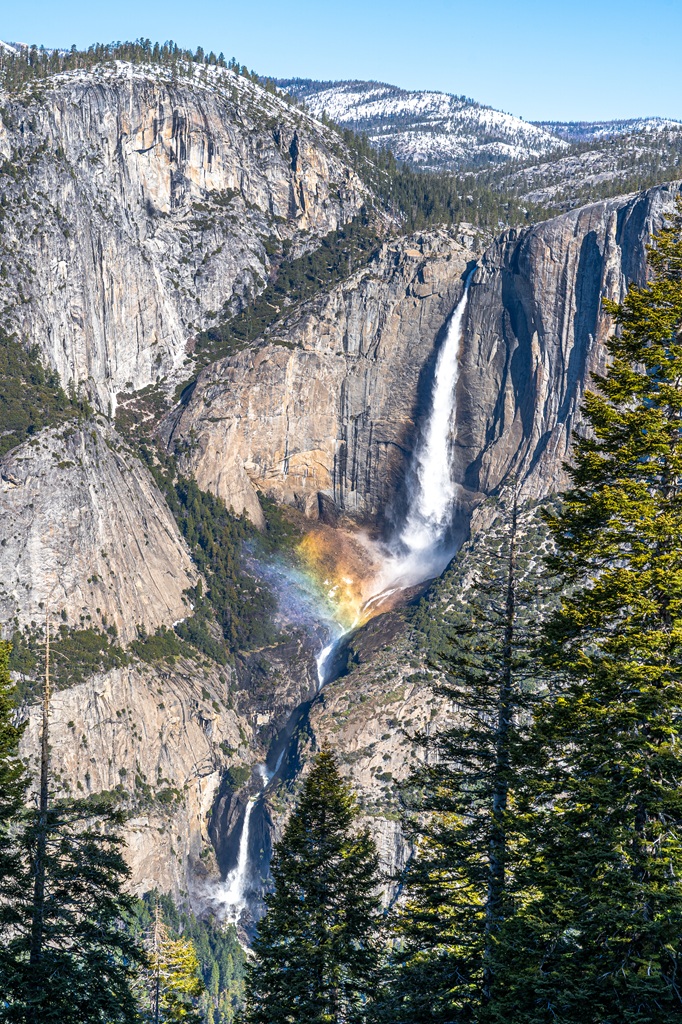
Highlights: Epic views (El Capitan, Half Dome, Cathedral Rocks, Yosemite Falls, Tenaya Canyon), Union Point, unnamed viewpoint, and Glacier Point
Four Mile Trail Yosemite Map
Yosemite National Park Entrance Fee and Reservations
Entrance to Yosemite National Park costs $35 per vehicle for a 3-day pass. However, if you have the America the Beautiful Annual Pass, your entry is free!
For those who love exploring national parks, investing in the Annual Pass is a smart choice. At just $80, for U.S. residents, it grants you access to over 2,000 federal recreation sites across the country!
FEE UPDATES! Beginning January 1, 2026, non-U.S. residents (without an annual pass) will pay a $100 per person in addition to the standard entrance fee. The Annual Pass for non-US residents will cost $250.
Reservations are not required this year. (updated July 8, 2026).
Four Mile Trailhead and Parking
The Four Mile Trail starts on the south wall of Yosemite Valley, with the Four Mile Trailhead located off Southside Drive between Swinging Bridge Picnic Area and Sentinel Beach.
📍 Google Maps Location: Four Mile Trailhead
🅿️ Trailhead Parking: There is a small roadside parking area directly across from the trailhead. Parking is very limited here and fills up fast! During the summer months and holidays, the Four Mile Trailhead parking area usually fills up by 7:30 AM – sometimes earlier.
🗺️ Distance to Trailhead: The trailhead is about 5.8 mile (9.3 km) from Yosemite Village and 6.8 miles (11 km) from the Curry Village (distance is shorter if walking from Yosemite Village or Curry Village).
🚗 Parking Tips: Since the trailhead parking area is so small and this is such a popular trail, plan to get there before 7 AM to secure a parking spot. If the trailhead lot is full, you can park at the Swinging Bridge Picnic Area and walk just 0.2 miles (0.3 km) to reach the trailhead.
🚻 Facilities: There are no restrooms or drinking water at the Four Mile Trailhead. You can find vault toilets and picnic tables at the Swinging Bridge Picnic Area just down the road.
🚌 Shuttle Option: You can take the free Yosemite Valley shuttle to stop #11 (Four Mile Trailhead).
🅿️ Alternate Trailhead: You can also begin this hike from Glacier Point which has a huge parking lot, vault toilets, drinking water (seasonal), and a store with snacks, drinks, and other hiking essentials.
If you plan to tackle this trail from Glacier Point as an out-and-back hike, make sure you are prepared for the climb back up to Glacier Point! It’s an easy hike going downhill, but it’ll be a steep and grueling climb back up.
✨ READ THIS: First Timer’s Guide to Glacier Point Road in Yosemite National Park
Best Time to Hike the Four Mile Trail in Yosemite National Park
🌷 Spring (March – May): The upper portion of the Four Mile Trail remains closed throughout much of the spring. But don’t worry, the lower portion, the first 3 miles (4.8 km) of the trail, is usually open!
The entire trail typically opens around the same time the Glacier Point Road opens which is usually sometime in May.
If you want to hike the Four Mile Trail from the valley floor to the top of Glacier Point in spring, check the current trail conditions to make sure it’s fully open.
☀️ Summer (June – August): Summer is the most popular time to hike the Four Mile Trail, thanks to the trail being fully open and snow-free. However, be prepared! Summer temperatures can soar with no reliable water sources along the trail except at Glacier Point.
If you’re hitting the trail during this season, start early to beat the heat and pack plenty of water. It’s also a good idea to bring a water filter in case you come across snowmelt-fed streams along the way.
But again, don’t expect to find water sources along the trail. A filter (or other treatment method) is useful if you were to run out of water and you happen to come across a small creek or surface water.
🍂 Fall (September – November): Fall is a beautiful time to hike the Four Mile Trail, with cooler temperatures and fewer crowds compared to the busy summer months.
Keep in mind, that by late fall, snowfall becomes a possibility, and the trail can close at any time, usually sometime in November. Always check trail conditions before you go!
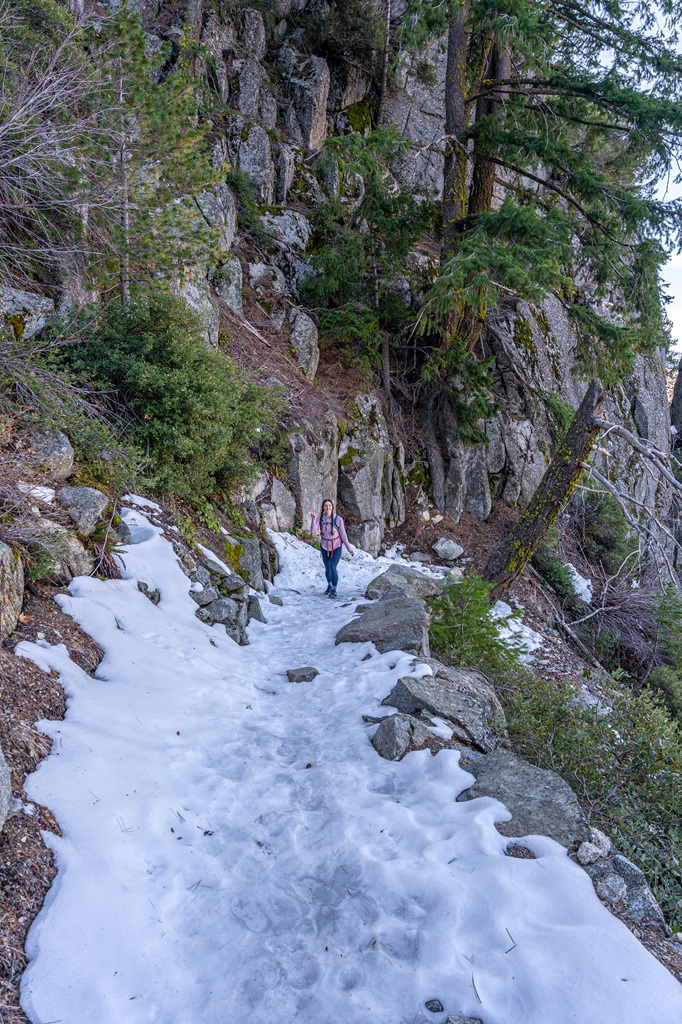
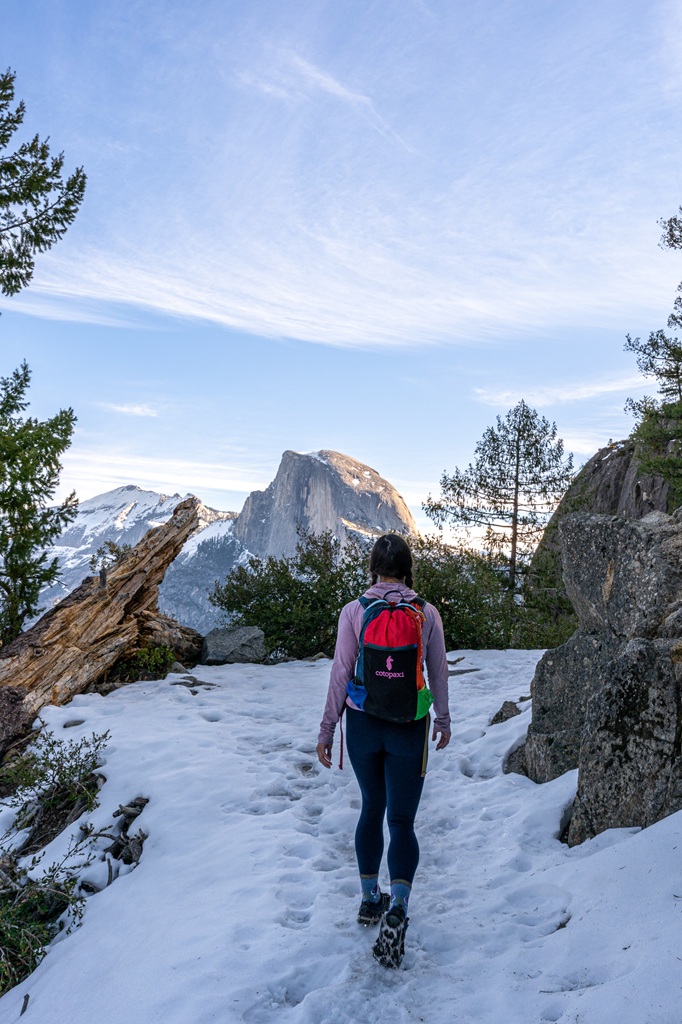
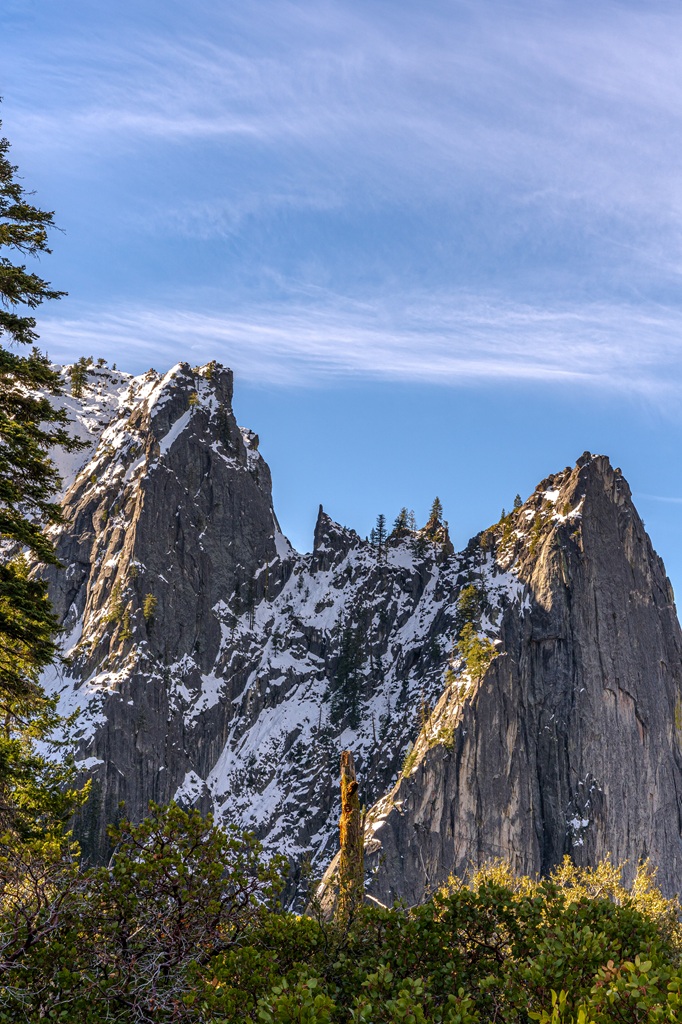
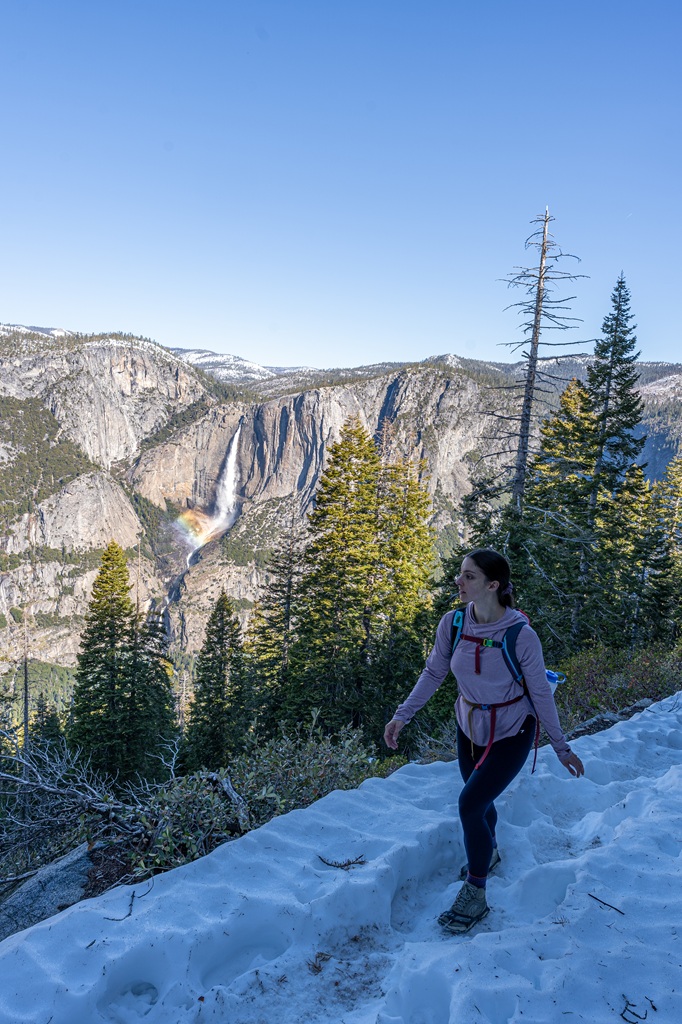
🌨️ Winter (December – February): In winter, the upper portion of the Four Mile Trail is closed. But the lower portion typically remains open up until the gate just below Union Point.
The view from the closed gate offers an incredible look at Half Dome, Clouds Rest, and North Dome.
Even when the lower portion is open, make sure you bring microspikes and hiking poles as there may be icy sections.
Generally, the full trail reopens sometime in May and closes again by late fall (November or December), usually after the first significant snowfall.
❄️ Yosemite National Park Winter Guides
- Ultimate Guide to Visiting Yosemite in Winter
- The Only Yosemite Winter Itinerary You Need!
- Where to Stay in Yosemite in Winter: 15+ Best Lodges, Hotels, and Cozy Cabins
- The Ultimate Yosemite Winter Packing List
- 20 Best Yosemite Hikes in Winter (Guide to Snowy Adventures)
- 18 Best Yosemite Winter Activities You Can’t Miss!
- Yosemite Firefall: A Complete First-Timer’s Guide
- Beginner’s Guide to Visiting Mariposa Grove in Winter
Four Mile Trail to Glacier Point: Step-by-Step Directions
Four Mile Trail
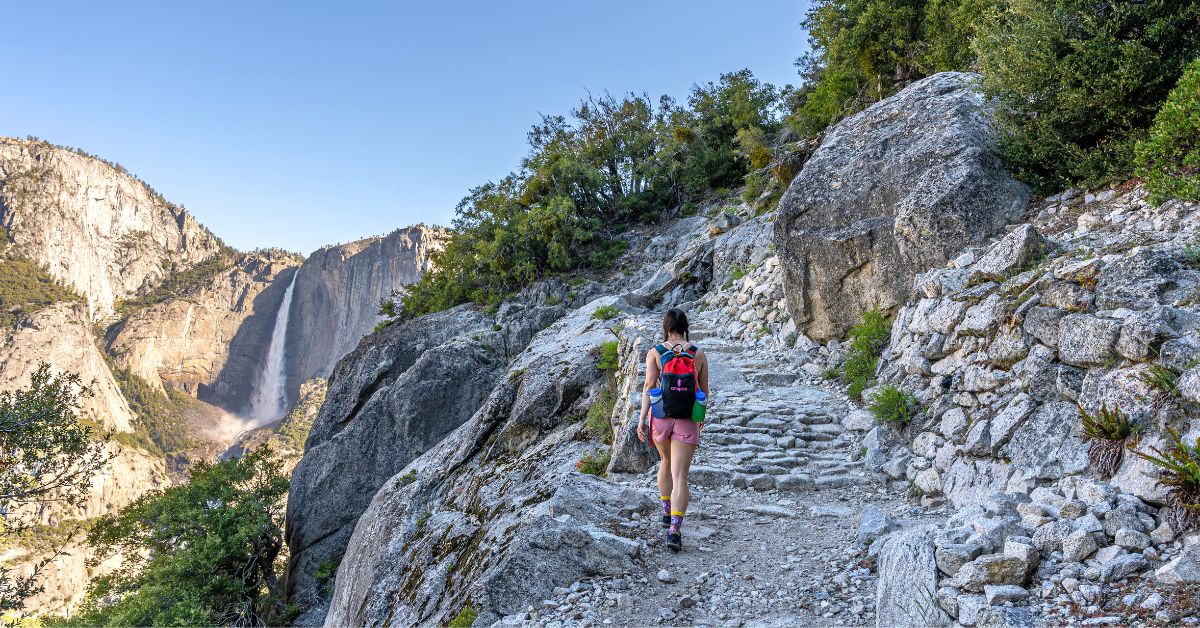
On this route, we will be starting from Yosemite Valley and climbing all the way up to Glacier Point.
It’s steep, packed with switchbacks, and overflowing with scenic views! Take your time, enjoy the views, and take lots of beautiful pictures for memories.
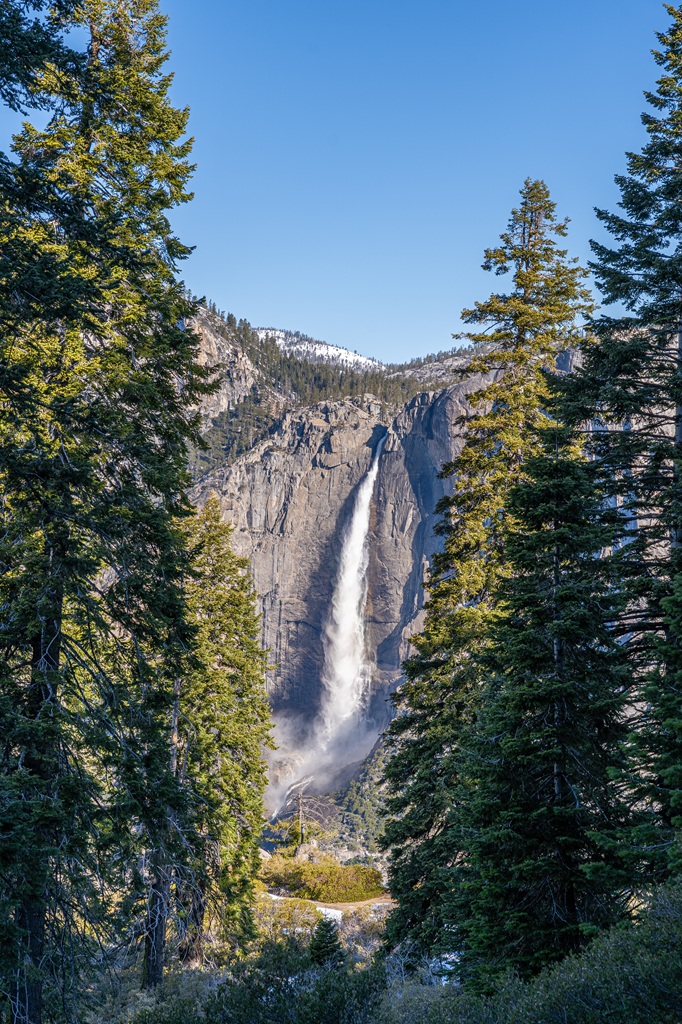
Unnamed Viewpoint
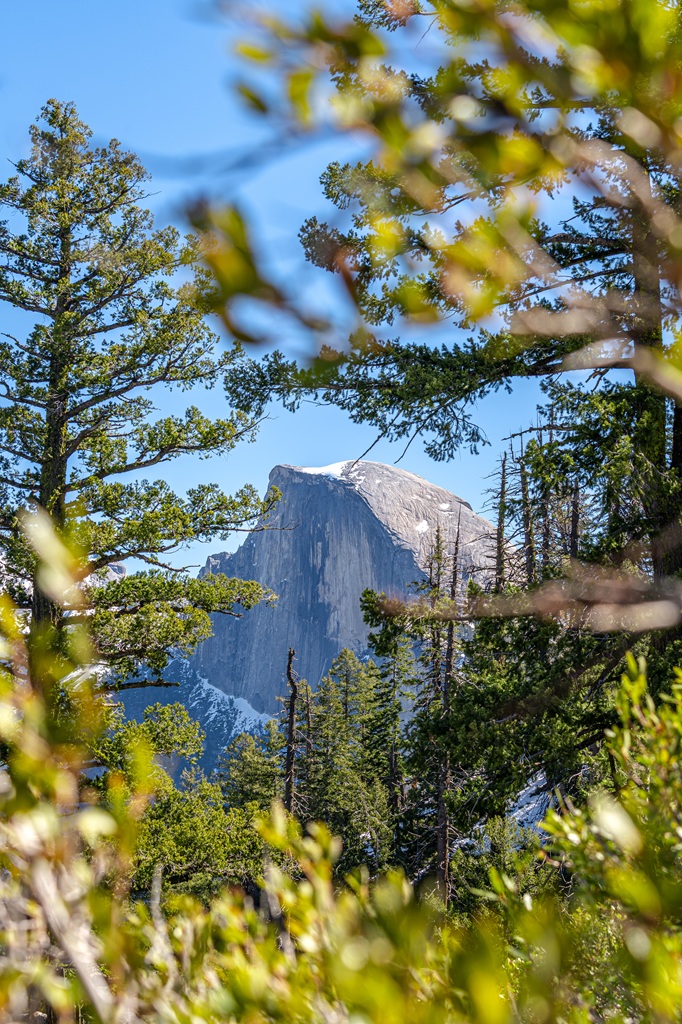
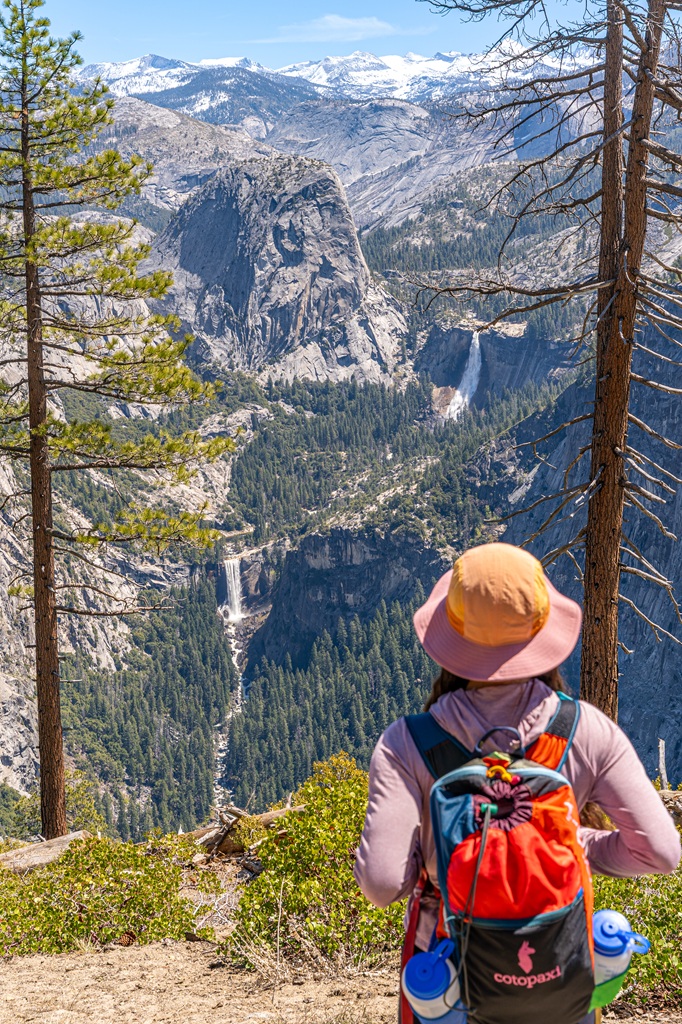
At around 2.8 miles (4.5 km) in, you’ll reach a jaw-dropping viewpoint of Half Dome and the east side of Yosemite Valley.
I don’t think it has a name, but trust me, it’s worth a quick stop to soak in the views and rest up.
When the upper section of the trail is closed for winter, this is the turnaround point. You will see a closed gate.
When it isn’t closed, then continue hiking up a few more switchbacks until you reach a junction at the 3.1-mile (5-km) mark.

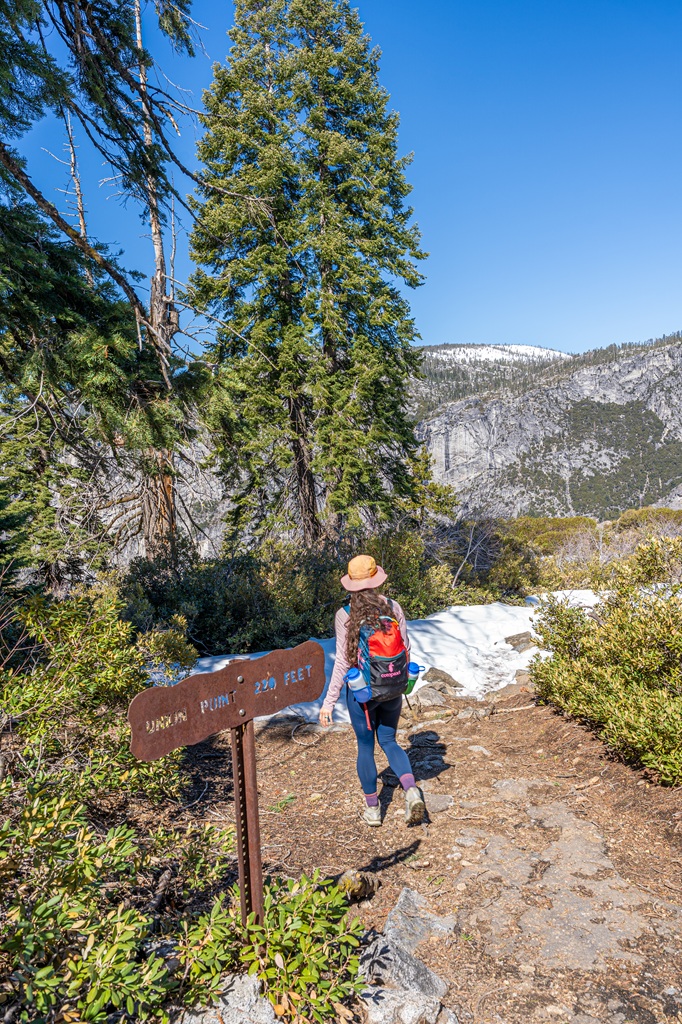
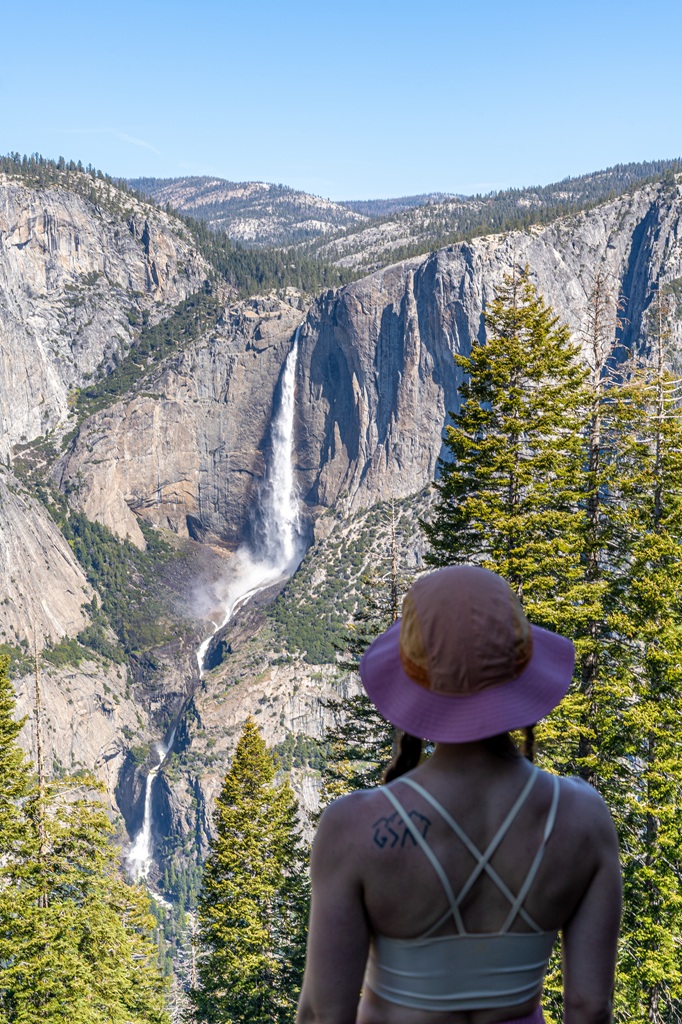
Union Point
At the junction, take a right to reach Union Point. It’s only 0.1 miles (0.2 km) one way from the junction to reach the viewpoint.
This is another overlook where you’ll get sweeping views of Sentinel Rock, Cathedral Rocks, El Capitan, and Yosemite Falls.
Retrace your steps back to the junction and continue straight along the Four Mile Trail towards Glacier Point.
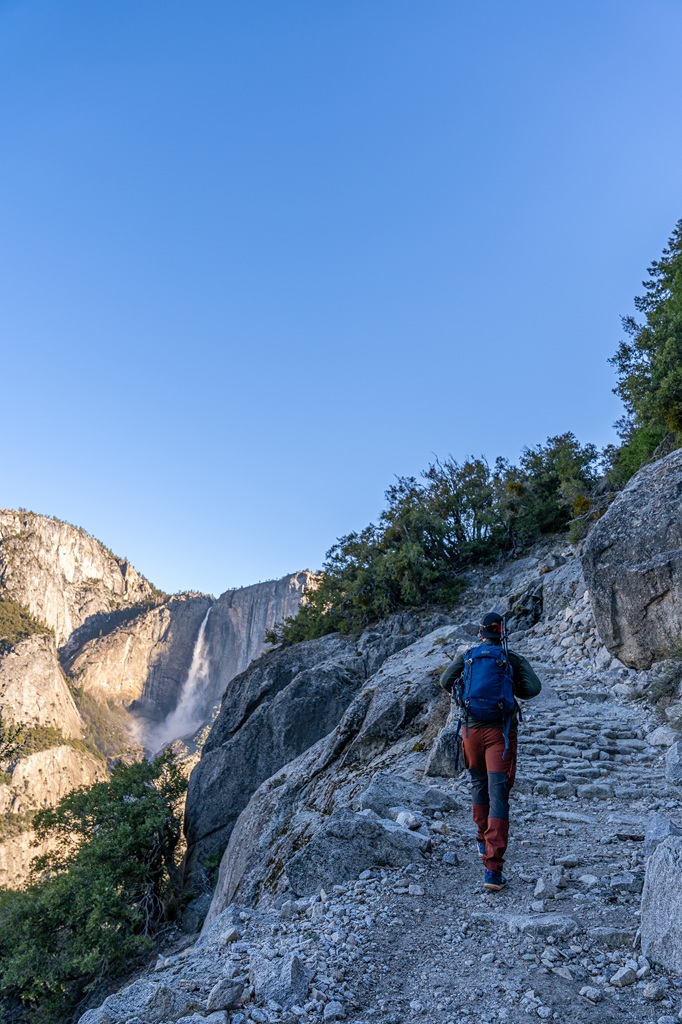
A Few More Switchbacks + Exciting Section of the Trail
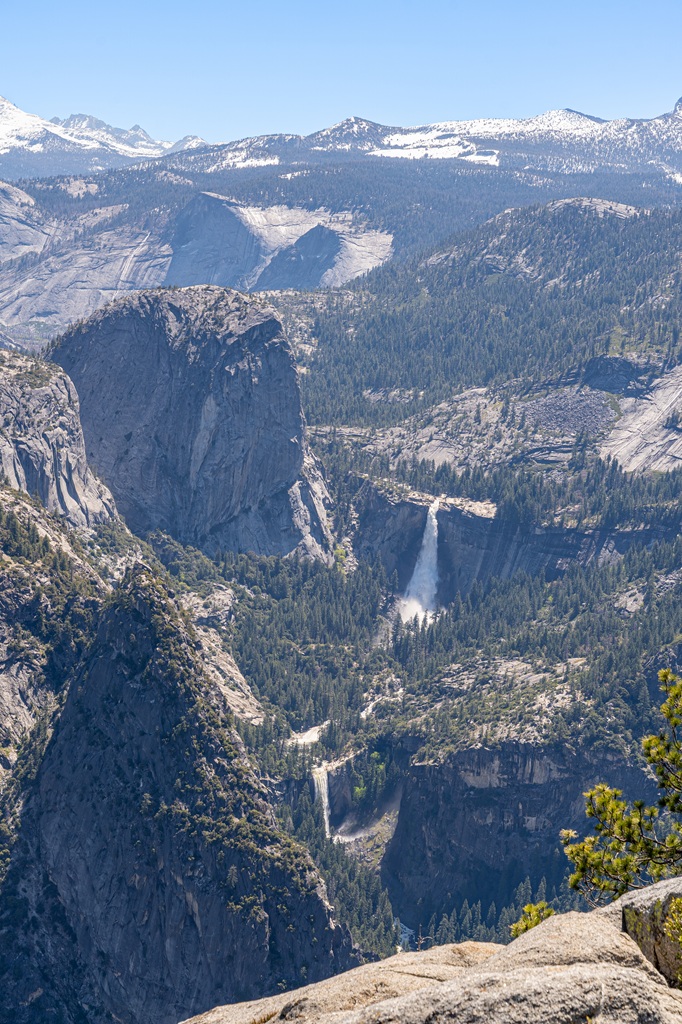
Past Union Point, you have about a dozen more switchbacks then the trail will level out (around the 4.2-mile / 6.8-km mark) giving your legs a much needed break from the intense climb.
One of my favorite sections of this entire trail is when it begins to follow the cliff wall. The trail becomes a bit narrow but still wide enough for two-way traffic.
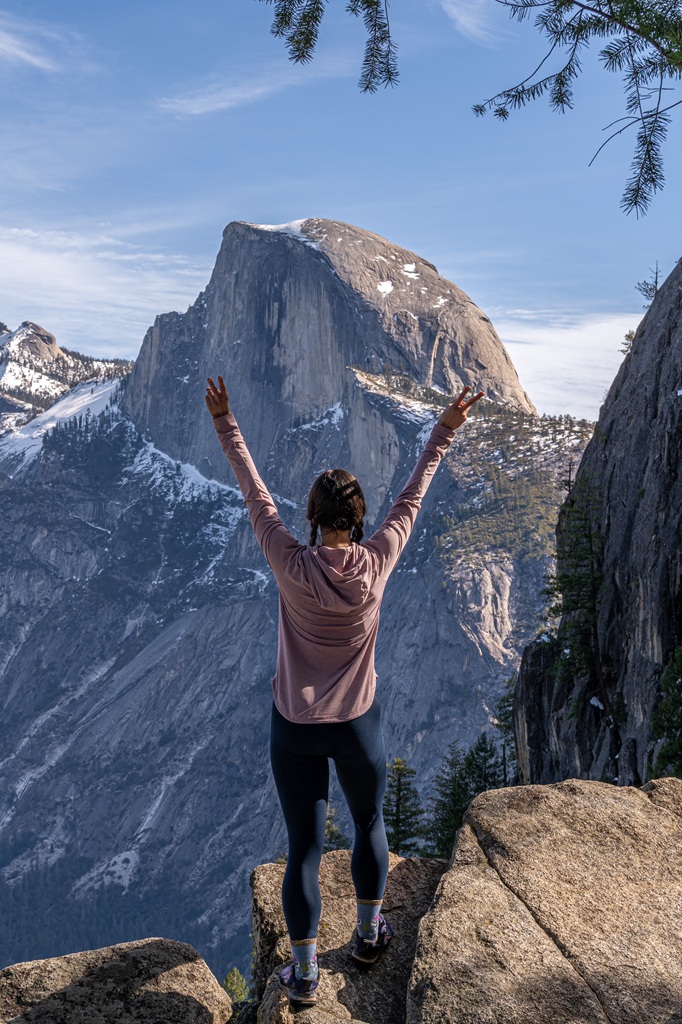
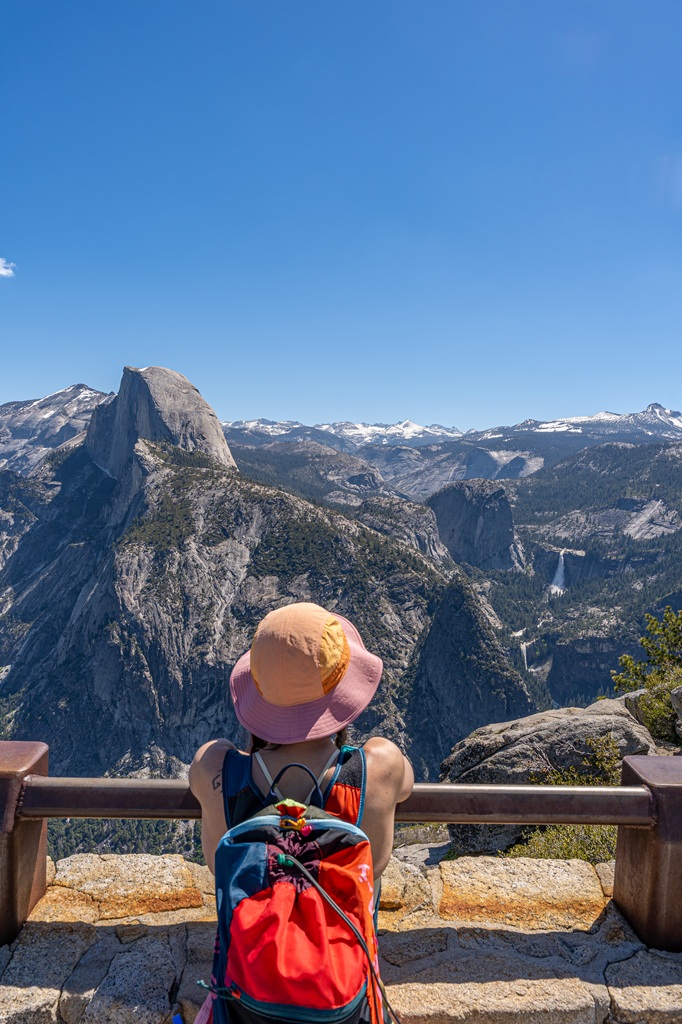
From here you will get beautiful views of Half Dome, North Dome, Tenaya Canyon, and High Sierra peaks.
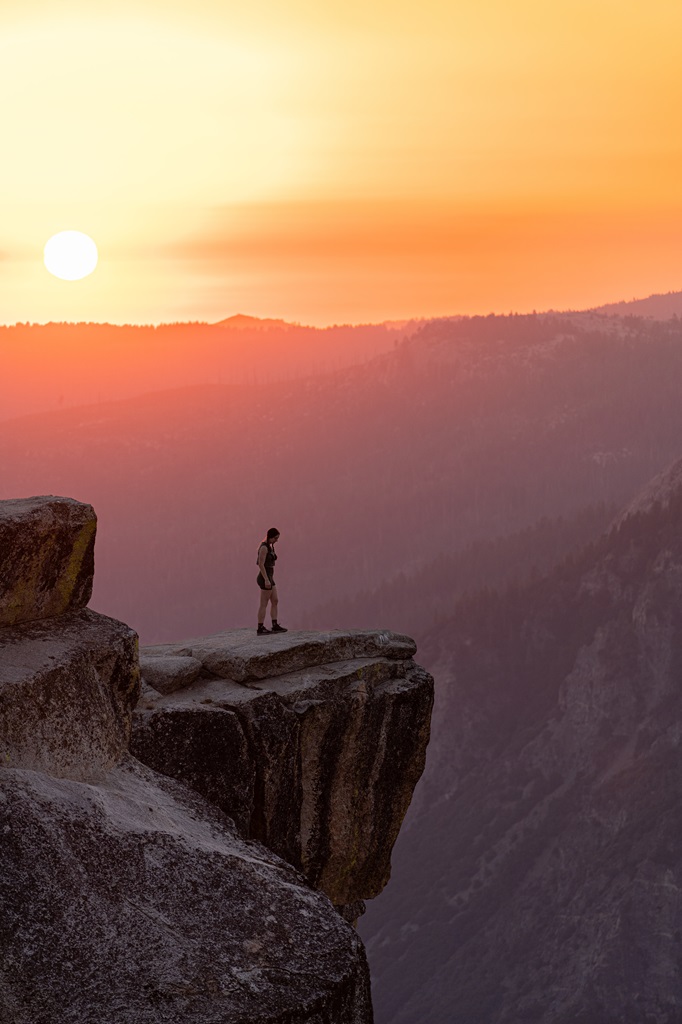
Glacier Point
Right before you reach Glacier Point, the trail heads uphill again but nothing near of steep as what you tackled before.
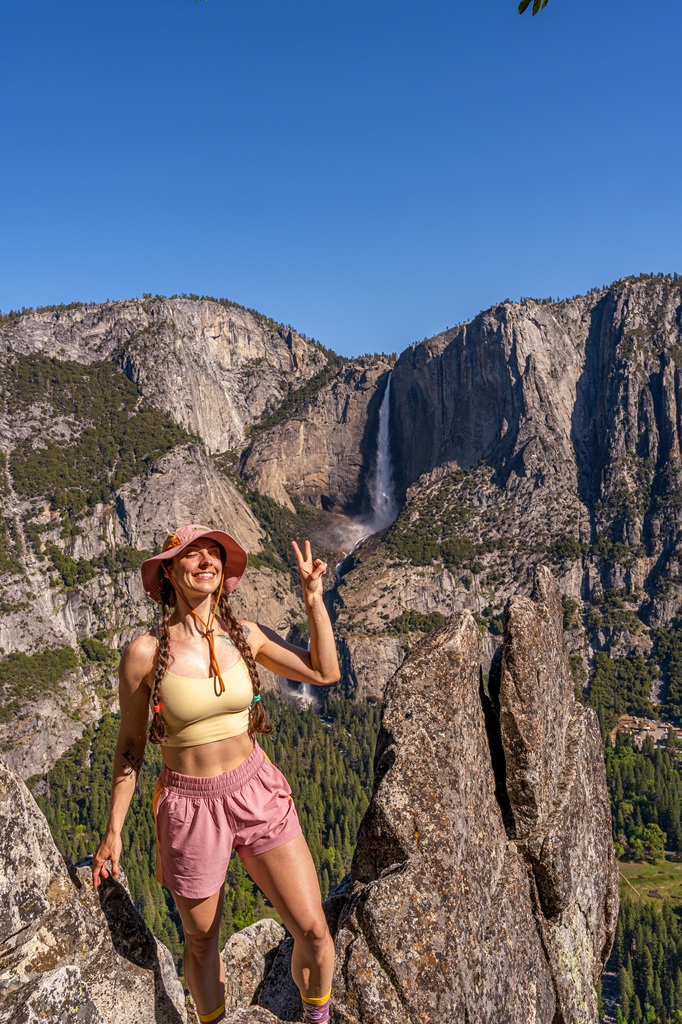
You made it to Glacier Point! 🙌
Time to celebrate with a snack, a breather, and maybe even some well-earned ice cream from the store (if it’s open).
The good news? It’s all downhill from here.
The not-so-good news? Descending can still be tough. Not so much on the lungs, but more so on the knee joints.
Don’t forget hiking poles! You’ll thank me later.
Congrats on conquering the Four Mile Trail! 🥳
🥾 Explore more of Yosemite Valley and Glacier Point with these hikes!
More Hiking Routes via Four Mile Trail
There are three more routes I want to discuss real quick! Who doesn’t love options?
These other options allow everyone with different skill levels to enjoy this trail. The routes include a steep but shorter hike, an all-downhill or all-uphill one-way hike, and a longer, super challenging yet super scenic hike.
My favorite route is the third one. It’s one of the most scenic hikes in the park!
1. Four Mile Trail to Union Point
Don’t feel pressured to hike the entire Four Mile Trail to Glacier Point! Unless your heart desires 3,400+ feet of elevation of gain featuring lots of switchbacks.
Instead, tackle 3.2 miles (5.1 km) one way with about 2,400 feet of elevation. Still a grueling hike but not as intense as hiking the entire trail.
You will still get all the incredible views of Yosemite Valley along with its iconic landmarks without having to climb all the way to Glacier Point.
But if you are able to reach Glacier Point, I highly recommend. 😉
Union Point Trail Stats
Starting Point: Four Mile Trailhead
Length: 6.4 miles (10.3 km) roundtrip
Elevation Gain: 2,400 feet
Difficulty: Challenging
Hiking Time: 4 to 6 hours
Route Type: Out-and-back
Highlights: Epic views (El Capitan, Half Dome, Cathedral Rocks, Yosemite Falls, Tenaya Canyon), Union Point, and unnamed viewpoint
Four Mile Trail to Union Point Map
2. Four Mile Trail (one-way route)
Many people choose to hike the Four Mile Trail one way as a 4.9-mile (7.9-km) point-to-point trek.
Either by climbing up from Yosemite Valley to Glacier Point for a challenging ascent or taking the easier downhill route from Glacier Point back to the valley floor.
If you want to hike it one way, just make sure you plan ahead! There’s no free shuttle service between Yosemite Valley and Glacier Point.
If you hike from the valley floor to Glacier Point, you’ll need someone to pick you up at the top or arrange a ride back down.
If you are planning to hike from Glacier Point to the valley, one option is to book a spot on the Glacier Point tour bus that departs from Yosemite Valley and stops at Glacier Point. You can purchase a ticket in advance to ride the bus up and then hike back down.
If you’re looking for a smooth experience, book the bus up and hike down. That way you get a scenic ride and a 5-mile (8-km) scenic downhill hike!
3. Four Mile Trail to Glacier Point and Panorama Trail + Mist Trail to Valley Floor
Most people do this route in reverse – starting on the Mist Trail, connecting to Panorama Trail to Glacier Point, then going down the Four Mile Trail. This is the route I personally recommend!
However, some people opt to go up the Four Mile Trail and down the Panorama Trail and Mist Trail.
If you don’t like the idea of going down the Mist Trail which has a ton of steps, you could opt for the John Muir Trail which will be a bit gentler on your knees.
This is a point-to-point hike. Once you reach the Mist Trail / John Muir Trail Trailhead, you can then take the shuttle back to wherever you parked your car.
Four Mile Trail and Panorama Trail + Mist Trail Stats
Starting Point: Four Mile Trailhead
Length: 14 miles (22.5 km) roundtrip
Elevation Gain: 4,450 feet
Difficulty: Challenging
Hiking Time: 8.5 to 10.5 hours
Route Type: Point-to-point
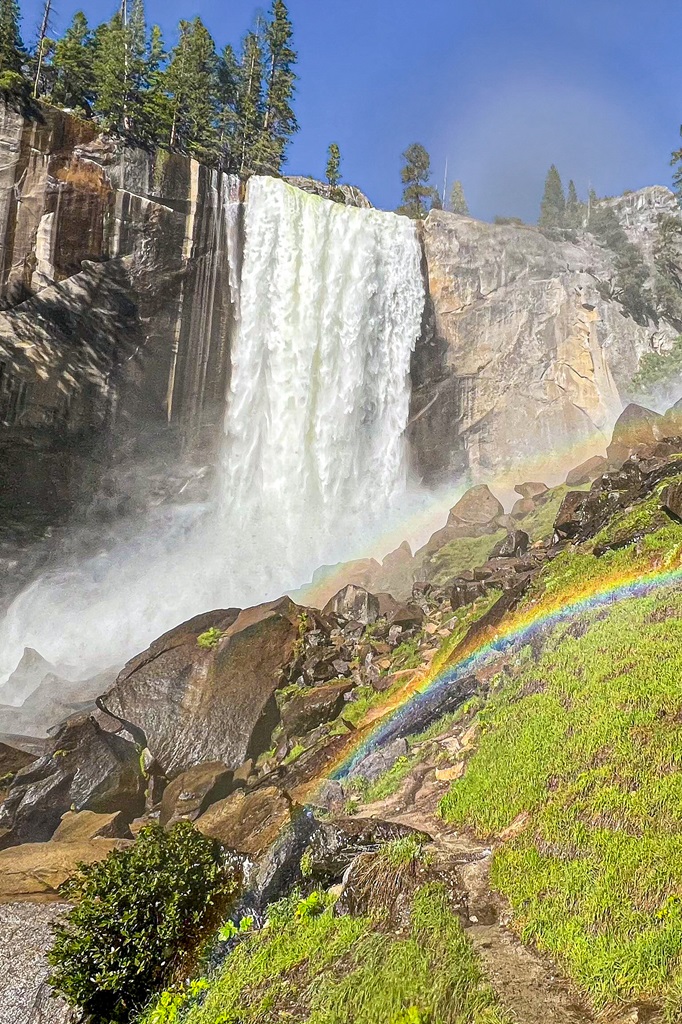
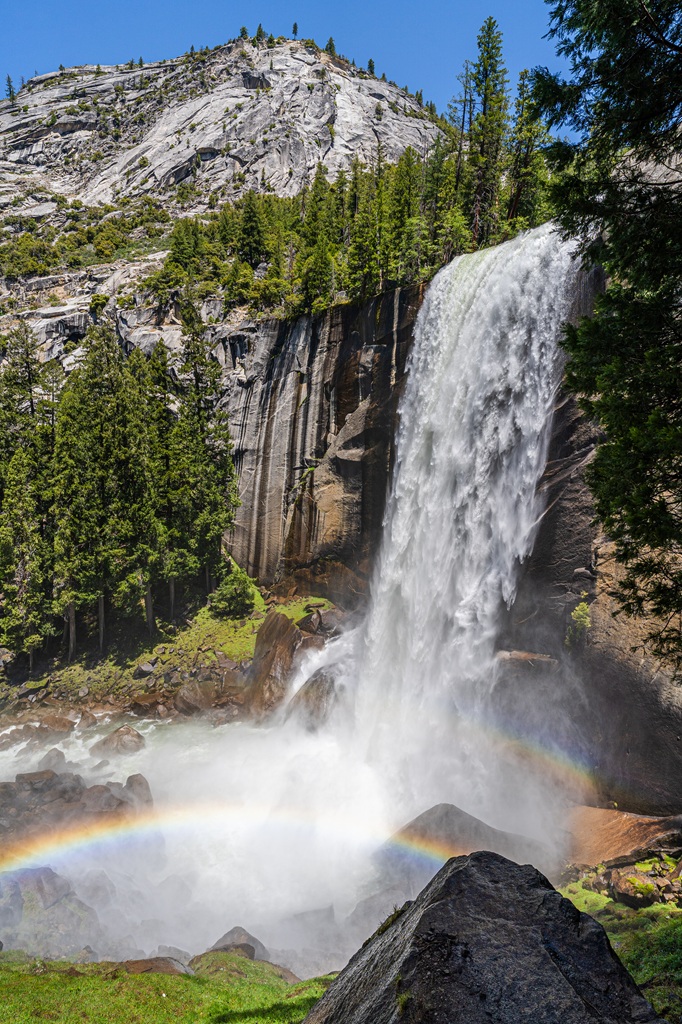
Highlights: Breathtaking views from Four Mile Trail and Panorama Trail, Glacier Point, Nevada Fall, and Vernal Fall
Four Mile Trail and Panorama Trail + Mist Trail Map
Tips for Hiking the Four Mile Trail in Yosemite National Park
1. Download Offline Maps: Following the Four Mile Trail is straight forward and easy to follow. But having offline maps downloaded on your phone (plus a physical map and compass) can give you peace of mind.
2. Start Early: Beat the crowds and enjoy cooler temperatures by starting your hike early in the morning, especially during peak season.
3. Be Prepared: Hiking the Four Mile Trail to Glacier Point has a challenging ascent with over 3,400 feet of elevation gain in about 5 miles (8 km). Make sure you’re prepared, in good physical condition, and pack plenty of water and snacks.
4. Check Trail Status: The Four Mile Trail is open seasonally typically from May to November – confirm it’s open before hiking this trail.
5. Bring Plenty of Water (+ Filter) and Electrolytes: This hike isn’t too long but it’s steep with plenty of elevation gain. Make sure you pack plenty of water!
The rule of thumb is about 1 liter per 2 hours of activity (or 1 liter per hour in summer). I recommend at least 2-3 liters per person along with a water filter to refill at Glacier Point.
There are no reliable water sources along the Four Mile Trail. When drinking water is turned on, you can refill at Glacier Point. There is also a store where you can buy drinks when it’s open.
6. Be Bear Aware: Black bears are active within Yosemite. Follow these guidelines to avoid any negative interactions with a black bear.
🐻 Note: Bear spray is prohibited in Yosemite National Park!
7. Respect Nature: Follow Leave No Trace principles – plan ahead, pack out all trash, avoid disturbing wildlife, be considerate of others, and respect the natural beauty of Yosemite National Park.
What to Bring to Yosemite National Park
🎟️ Entrance Pass – You will need to purchase an entrance pass once you reach the entrance station or you can buy the America the Beautiful Pass ahead of time and use that for the entire year.
👚 Layers of Clothing (top) – Pack a moisture-wicking base layer, a fleece mid-layer, an insulated jacket, and an outer shell to protect you from the elements, such as rain and wind. You may not need all these layers, especially in the summer months, but it’s always best to be over-prepared!
Check out my favorite tops 👇
- Base layer: REI Co-op Sahara Shade Hoodie (warm/mild conditions) and REI Co-op Midweight Long-Sleeve Base Layer (cooler conditions)
- Fleece mid layer: Cotopaxi Teca Fleece Full-Zip Jacket
- Down mid layer: Cotopaxi Fuego Hooded Down Jacket
- Outer shell: In the summer I always pack a light windbreaker, such as the Cotopaxi Teca Crop Windbreaker or the RevolutionRace Unit Light Windbreaker. Make sure to also pack a waterproof rain jacket – I like the Patagonia Torrentshell 3L Jacket.
🩳 Hiking Shorts or Pants – Pack a comfortable, durable, and stretchy pair of hiking shorts or pants. Also think about what conditions you might run into, such as warm or cold temperatures, wind and/or rain, bugs, and overgrown trails.
Check out my favorite hiking bottoms 👇
- Cotopaxi Losdos Zip-Off Pants
- RevolutionRace Breezy Ankle Outdoor Pants
- Baleaf Fleece-Lined Jogger Pants
- RevolutionRace Summit Pocket Tights
- Revolution Race Hike & Dive Shorts
🥾 Hiking Footwear – Bring a good pair of hiking boots or shoes with good traction. If I’m not expecting to hike in too much mud or snow, my go-to hiking shoes are the Altra Lone Peak trail runners. They have a wide-toe box, 0 mm heel-to-toe drop, and MaxTrac rubber outsole. Plus, they’re lightweight and so comfy!
🧦 Socks – Moisture-wicking, quick-drying socks are the way to go. My favorite pair of hiking socks are Darn Tough Hiker Micro Crew Cushion Socks. Always pack an extra pair!
🎒 Day Pack – What you plan to do (sightseeing, hiking, etc.), determines what size pack you’ll need. Here is what I typically bring based on what I’m doing that day 👇
- Short walks and sightseeing: Cotopaxi Kapai 1.5L Del Dia Hip Pack
- Short, easy to moderate day hikes: REI Co-op Flash 22L Pack
- Long, moderate to challenging day hikes: REI Co-op Trail 25L Pack or Cotopaxi Luzon Del Dia 24L Pack
🥢 Trekking Poles – Essential for stability, balance, and support when hiking trails, especially on tough, rocky, and uneven terrain. I use REI Co-op Trailmade Trekking Poles and love them!
❄️ Microspikes – Bring a pair of microspikes if you’re visiting in the winter and you’re planning to hike along icy trails. They will give you good traction to avoid slipping! I use Black Diamond Access Spike Traction Device.
🦟 Mosquito/Bug Repellants – In the warmer months, be prepared for annoying gnats, mosquitoes, and flies. Wear long-sleeve clothing, a head net, and use bug spray.
🧤 Extra Warm Layers – If you expect cooler conditions or hiking to higher elevations, make sure to pack extra layers for added warmth, such as gloves, beanie, neck gaiter, and a light jacket.
🗺️ Navigation – Carry a physical topographic map, compass, a satellite messenger (or personal locator beacon), and download offline maps to help you stay on course, find your way in unfamiliar terrain, and call for help if needed.
🔦 Headlamp/Flashlight – A reliable light source with extra batteries, in case you end up hiking in the dark or need it for emergency situations.
💧 Water – Water bottles to carry sufficient water to stay hydrated, along with a filtration system or purification tablets if you plan to refill from natural sources.
🍕 Food – Energy-rich snacks or meals to keep your energy levels up during the hike.
😎 Sun Protection – Sunscreen, sunglasses, and a sunhat to protect yourself from harmful UV rays, even when it’s cloudy. Also, polarized sunglasses are important when it’s bright outside and to reduce glare from reflective surfaces like water, snow, and roads.
🩹 First-Aid Kit – A basic first-aid kit with items like bandages, antiseptic, pain relievers, and any personal medications you may need.
🥶 Emergency Shelter – Pack an emergency bivy sack or space blanket for shelter in case of sudden weather changes.
🔥 Fire – A lighter, matches, or fire starter to help you build a fire for warmth or signaling in case of emergency. Along with matches, I also carry a multi-tool carabiner that has a fire starter, utility blade, screwdriver, and bottle opener.
🗡️ Multi-Tool and Repair Kit – A versatile tool/knife and repair kit to handle any task, from preparing food to making repairs.
💩 Waste Disposal Supplies – WAG bags, trowel, toilet paper, pee cloth, wipes, Ziploc bags – be sure to pack out everything!

Conclusion
The Four Mile Trail is a Yosemite favorite. Why you ask? Well, the views are STUNNING!
Though it’s closer to 5 miles (8 km) one way, the nonstop views of Yosemite Valley, Tenaya Canyon, and the High Sierra peaks make every step worth it. Whether you hike it roundtrip or one way, plan ahead and be prepared!
If this guide inspires you to hike the Four Mile Trail in Yosemite National Park, I’d love to hear about your adventure. Leave a comment and share your experience!
🤩 Yosemite National Park Travel Guides
- 1-Day Yosemite Itinerary for First-Time Visitors
- Where to Stay Outside of Yosemite (best places in 2026)
- 13 Best Hikes in Yosemite Valley You Can’t Miss!
- Fresno to Yosemite Day Trip: Itinerary for Every Season
- First Timer’s Guide to Glacier Point Road in Yosemite
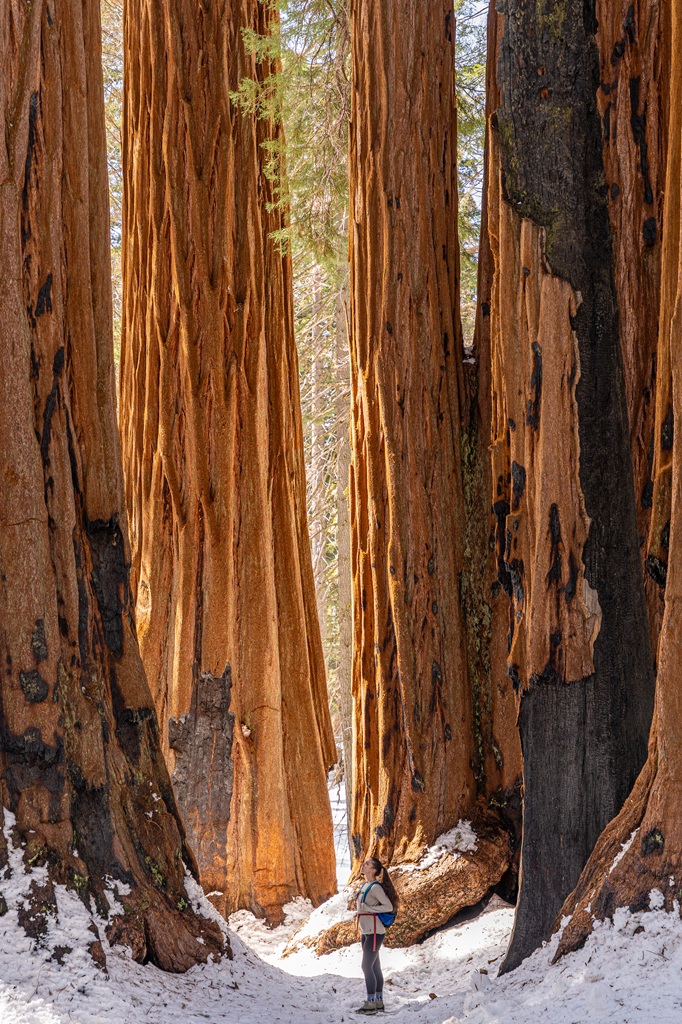
- Best Spots to Find Giant Sequoia Trees in Yosemite
- 10 Must-Do Easy Hikes in Yosemite for All Skill Levels
- Hetch Hetchy Hikes: Explore This Hidden Gem
- 20 Best Yosemite Waterfalls You Can’t Miss!
- Ultimate Guide to Visiting Yosemite in May
- Is Tioga Pass Open? Plan an Epic Trip with This Guide
- 13 Best Tioga Pass Hikes for Adventure Lovers
- 20 Best Things to Do in Tuolumne Meadows and Tioga Pass in Yosemite
📌 Enjoyed this post? Pin for later!
🏞️ Explore more incredible places in California!